Heating or cooling a home without traditional ductwork can be expensive, especially if you rely on window air conditioners, electric baseboard heaters, or portable units.
A ductless mini-split offers another option. These systems provide efficient heating and cooling without requiring a network of air ducts. They’re increasingly popular for older homes, room additions, garages, and spaces with uneven temperatures.
Read Also: How to Lower Your AC Bill: 15 Fixes That Actually Work
But is a mini-split worth the investment?
The answer depends on your climate, existing equipment, electricity rates, and installation requirements.
This guide explains ductless mini split cost, including equipment prices, professional installation, monthly electricity expenses, and potential energy savings.
You’ll also learn how mini-splits compare with central air conditioning, what size system you might need, and which installation decisions can make the biggest difference in long-term operating costs.
Quick Takeaways
What homeowners should know
- Installed cost: A professionally installed single-zone mini-split often costs approximately $3,000–$7,000. Multi-zone systems can cost $6,000–$18,000 or more.
- Heating and cooling: Most mini-split heat pumps provide both functions using the same equipment.
- Energy efficiency: ENERGY STAR-certified models can use less electricity than older, less efficient heating and cooling equipment.
- No ductwork required: Mini-splits work well in older homes, additions, and rooms where installing ducts would be difficult.
- Running costs vary: Electricity rates, outdoor temperatures, equipment efficiency, and daily operating hours determine actual expenses.
- Cold climates: Some models are specifically designed to maintain heating performance at low outdoor temperatures.
- Professional installation matters: Refrigerant connections, electrical work, and system commissioning require qualified technicians.
- Best financial fit: Mini-splits are often worth comparing when replacing electric resistance heating, cooling an addition, or avoiding expensive ductwork.
What Is a Ductless Mini-Split?
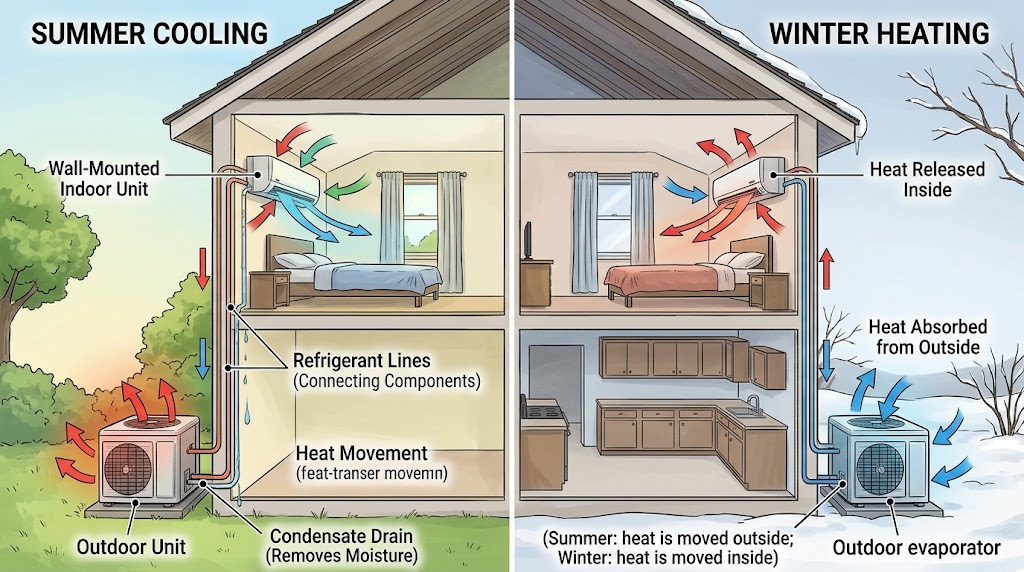
A ductless mini-split is a heating and cooling system that moves heat between indoor and outdoor spaces without distributing air through traditional ductwork.
Read Also: Heat Pump vs Furnace: Costs, Efficiency, and Which Is Right for Your Home
Most residential mini-splits are air-source heat pumps. That means they transfer heat rather than generate it through electric resistance heating.
A typical system contains two main components.
Outdoor unit
The outdoor unit contains a compressor, heat-exchange coil, and fan.
During summer, it releases heat collected from inside the home.
During winter, it absorbs heat from outdoor air and transfers that heat indoors.
Indoor unit
The indoor unit delivers conditioned air directly into a room.
Wall-mounted units are common, but ceiling-mounted, floor-mounted, and concealed configurations are also available.
The indoor and outdoor components connect through insulated refrigerant lines, electrical connections, and condensate drainage components.
How does a mini-split heat and cool?
During cooling, the system absorbs heat from indoor air and transfers it outside.
During heating, the refrigeration cycle reverses. The equipment extracts available heat from outdoor air and moves it indoors.
Even cold outdoor air contains usable heat, although the amount available and the system’s efficiency generally decrease as temperatures fall.
Many modern mini-splits use inverter-driven compressors.
An inverter allows the compressor to adjust its speed instead of repeatedly switching between full power and off.
This variable-speed operation can improve temperature consistency and reduce energy consumption under suitable operating conditions.
Single-zone vs multi-zone systems
A single-zone system connects one outdoor unit to one indoor unit.
It’s commonly used for:
- Bedrooms
- Home offices
- Finished basements
- Garage conversions
- Sunrooms
- Room additions
A multi-zone system connects several indoor units to one outdoor unit.
Each indoor unit can generally serve a separate temperature zone, although operating capabilities depend on the system.
Read Also: Heat Pump Cost Guide: Installation Prices, Running Costs, and Payback
Multi-zone systems offer flexibility, but they usually cost more and aren’t automatically more efficient than properly selected single-zone equipment.
Understanding these configurations helps explain why installation prices vary so widely.
How Much Does a Ductless Mini-Split Cost?
For many US homeowners, ductless mini split cost is the first major consideration.
A reasonable preliminary budget for a professionally installed single-zone system is approximately $3,000–$7,000.
However, actual quotes may fall outside this range depending on the region, equipment, installation complexity, and electrical requirements.
Typical installed mini-split prices
The following figures are broad planning estimates, not national price averages or contractor quotes.
| System type | Typical capacity | Estimated installed cost | Common application |
|---|---|---|---|
| Small single-zone | 9,000 BTU/h | $3,000–$5,500 | Small bedroom or office |
| Medium single-zone | 12,000 BTU/h | $3,200–$6,000 | Larger bedroom or living area |
| Large single-zone | 18,000 BTU/h | $3,800–$7,000 | Open living space |
| Extra-large single-zone | 24,000 BTU/h | $4,500–$8,500 | Large open area |
| Two-zone system | 18,000–30,000 BTU/h total | $5,500–$10,000 | Two separate rooms |
| Three- or four-zone system | Varies | $8,000–$18,000+ | Multiple rooms |
BTU/h means British thermal units per hour. It’s a measurement of heating or cooling capacity.
A 12,000 BTU/h system provides a nominal capacity equivalent to one ton of cooling.
These prices assume professional installation and typical residential conditions. They exclude unusually extensive electrical upgrades, major structural work, and significant repairs.
Equipment-only costs
Equipment prices can be substantially lower than installed prices.
For budgeting purposes, single-zone equipment may cost roughly $900–$3,000 or more, depending on capacity, efficiency, and features.
But buying the equipment is only part of the project.
Professional installation may involve:
- Electrical circuit installation
- Refrigerant piping
- Condensate drainage
- Wall penetrations
- Equipment mounting
- Refrigerant-system testing
- Startup and performance verification
Some manufacturers also have specific installation requirements for warranty coverage.
A lower equipment price doesn’t necessarily mean a lower total project cost.
What Affects Mini-Split Installation Costs?
Two homes with similar floor plans can receive very different installation quotes.
Read Also: Best Thermostat Settings for Summer and Winter (Save Money, Stay Comfortable)
That’s because contractors must account for more than equipment capacity.
1. Number of indoor units
A single-zone system is usually the least expensive configuration.
Each additional indoor unit adds equipment, refrigerant piping, drainage requirements, electrical or control connections, and installation labor.
A three-zone installation can therefore cost considerably more than one large single-zone system.
2. Electrical requirements
Mini-splits need an appropriate electrical supply.
Some homes already have suitable electrical capacity and convenient circuit access.
Others require new circuits, disconnect equipment, longer wiring runs, or electrical panel upgrades.
Hire a licensed electrician for electrical work. Homeowners should not attempt panel modifications or hardwired connections.
3. Distance between indoor and outdoor units
Longer refrigerant lines generally increase material and labor costs.
The installation may also require protective line covers or more complicated routing.
Manufacturers specify maximum line lengths and elevation differences that installers must follow.
Read Also: How to Lower Your Electric Bill: 35 Proven Ways (Room-by-Room Checklist)
4. Outdoor unit location
Outdoor equipment needs suitable airflow, drainage, service access, and mounting support.
Ground-mounted installations may be straightforward where space allows.
Wall brackets, rooftop installations, elevated platforms, or difficult access can increase costs.
5. Cold-climate equipment
Mini-splits designed for low-temperature heating may carry higher equipment prices.
Their value depends on local winter conditions, heating demand, and available backup heating.
6. Permits and local labor rates
Permit requirements vary by jurisdiction.
Installation labor can also cost more in expensive metropolitan areas or locations with limited contractor availability.
Mini-split installation quote checklist
| Item to verify | Why it matters | Checked? |
|---|---|---|
| Written heating and cooling load calculation | Helps prevent incorrect sizing | ☐ |
| Equipment model numbers | Allows efficiency and warranty comparisons | ☐ |
| Number and location of indoor units | Affects comfort and total price | ☐ |
| Outdoor unit placement | Influences noise, airflow, and service access | ☐ |
| Electrical work included | Helps avoid unexpected charges | ☐ |
| Refrigerant line routing | Affects appearance and installation complexity | ☐ |
| Condensate drainage plan | Helps prevent moisture problems | ☐ |
| Permits and inspections | Supports code compliance | ☐ |
| Warranty terms | Clarifies future repair coverage | ☐ |
| Total installed price | Makes competing quotes easier to compare | ☐ |
Request at least two or three detailed quotes when practical.
Comparing identical equipment isn’t always necessary, but each proposal should explain the recommended capacity, system configuration, and included work.
Mini-Split vs Central Air: Which Is Better?
The mini split vs central air decision depends heavily on your home’s existing infrastructure.
Central air conditioning distributes cooled air through ducts.
Ductless systems deliver conditioned air directly into individual rooms or zones.
Neither approach is universally better.
Mini-split vs central air comparison
| Feature | Ductless mini-split | Central air conditioning |
|---|---|---|
| Ductwork required | No | Usually yes |
| Room-by-room control | Common | Requires zoning equipment |
| Heating available | Yes, with heat pump models | Requires heat pump or separate heating |
| Installation disruption | Often relatively limited | Depends on existing ducts |
| Indoor appearance | Visible units in many configurations | Usually ceiling or floor registers |
| Whole-home coverage | May require multiple indoor units | Well suited to ducted homes |
| Maintenance | Multiple indoor filters and coils | Central filter plus system maintenance |
| Typical advantage | Targeted conditioning | Integrated whole-home distribution |
When mini-splits make more sense
Consider a mini-split when:
- Your home has no ductwork.
- You’re finishing an attic or basement.
- One room stays uncomfortable.
- You’re adding living space.
- Your existing heating relies on electric resistance.
- Installing new ducts would be expensive or disruptive.
Mini-splits can also complement existing central HVAC.
For example, a second-floor bedroom might benefit from a dedicated system without replacing the entire central air conditioner.
When central air may be better
Central air may be more practical when your home already has well-designed, properly sealed ducts.
A conventional central system can distribute conditioned air throughout multiple rooms while keeping most equipment out of sight.
If you’re replacing an aging central air conditioner, compare a central heat pump as well.
A central heat pump uses existing ductwork while providing both heating and cooling.
Don’t overlook duct losses
According to the US Department of Energy, duct losses can account for more than 30% of energy consumption for space conditioning in some systems, particularly when ducts run through unconditioned areas.
That doesn’t mean removing ducts automatically saves 30%.
Actual savings depend on duct condition, location, insulation, air leakage, and equipment efficiency.
If your home already has ductwork, sealing and insulating it may be more economical than installing an entirely new ductless system.
Related reading: How to Seal Air Leaks and Reduce Home Energy Waste
Mini-Split Efficiency: Understanding the Ratings
Mini-split efficiency is one reason homeowners consider ductless heat pumps.
However, equipment ratings require some explanation.
What does SEER2 mean?
SEER2 stands for Seasonal Energy Efficiency Ratio 2.
It measures seasonal cooling efficiency using updated testing procedures.
A higher SEER2 rating generally indicates better cooling efficiency.
For example, a 22 SEER2 system is rated more efficient than a 16 SEER2 system under the standardized test conditions.
However, actual electricity consumption also depends on climate, installation quality, thermostat settings, and operating patterns.
What does HSPF2 mean?
HSPF2 stands for Heating Seasonal Performance Factor 2.
It measures seasonal heating efficiency for heat pumps.
Higher HSPF2 ratings generally indicate more efficient heating performance under the applicable test procedure.
For cold climates, also examine the manufacturer’s heating capacity and efficiency data at low outdoor temperatures.
A high seasonal rating alone doesn’t guarantee strong performance during extreme cold.
What is COP?
COP means coefficient of performance.
It compares useful heating output with the electricity consumed.
For example:
- COP of 1: 1 unit of heat delivered per unit of electricity
- COP of 2: 2 units of heat delivered per unit of electricity
- COP of 3: 3 units of heat delivered per unit of electricity
Electric resistance heaters have a heating COP of approximately 1 at the point of use.
A heat pump may achieve a COP greater than 1 because it transfers heat instead of producing all its heat through electrical resistance.
COP changes with outdoor temperature and operating conditions.
ENERGY STAR certification
ENERGY STAR-certified heat pumps meet efficiency requirements established by the Environmental Protection Agency.
Certification is a useful starting point when comparing equipment.
For heating-dominated climates, examine cold-climate performance in addition to certification.
You can compare qualifying products through the ENERGY STAR heating and cooling resources.
Realistic Costs & Savings
A mini-split’s purchase price is only one part of its lifetime cost.
The other major consideration is electricity consumption.
Your mini split running cost depends on how much power the system uses, how long it operates, and what your utility charges per kilowatt-hour.
A kilowatt-hour, abbreviated kWh, represents one kilowatt of electricity consumed for one hour.
How to calculate mini-split electricity costs
Use this formula:
Electricity cost = Average power consumption (kW) × Operating hours × Electricity rate ($/kWh)
For example, assume:
- Average electrical consumption: 0.8 kW
- Equivalent operating time: 8 hours daily
- Electricity price: $0.17/kWh
- Billing period: 30 days
Calculation:
0.8 × 8 × 30 = 192 kWh
192 × $0.17 = $32.64 per month
In this example, the mini-split costs approximately $33 monthly to operate.
This is an illustration, not a prediction.
An inverter-driven mini-split changes its power consumption throughout the day. Therefore, average electrical demand is more useful than simply multiplying maximum rated wattage by every hour the unit is switched on.
Estimated monthly electricity costs
The table below uses an assumed electricity rate of $0.17/kWh and 30 days per month.
| Average electrical demand | Equivalent hours/day | Monthly electricity | Monthly cost |
|---|---|---|---|
| 0.4 kW | 6 | 72 kWh | $12.24 |
| 0.6 kW | 8 | 144 kWh | $24.48 |
| 0.8 kW | 8 | 192 kWh | $32.64 |
| 1.2 kW | 10 | 360 kWh | $61.20 |
| 1.8 kW | 12 | 648 kWh | $110.16 |
These figures represent electricity costs for the assumed operating scenarios, not measured averages for particular mini-split sizes.
Actual consumption may be lower or substantially higher.
Worked example: Replacing electric baseboard heating
Consider a 2,000-square-foot home in a mixed climate.
Suppose the homeowner uses electric baseboard heaters in a 400-square-foot finished area.
Assume that area requires 4,800 kWh of useful heating energy during the heating season.
Electric resistance heating converts approximately one kWh of electricity into one kWh of heat at the point of use.
At $0.17/kWh:
4,800 × $0.17 = $816 per heating season
Now assume a properly installed mini-split supplies the same useful heat with an illustrative seasonal average COP of 2.5.
Required electricity:
4,800 ÷ 2.5 = 1,920 kWh
Heating cost:
1,920 × $0.17 = $326.40
Estimated difference:
$816 − $326.40 = $489.60 per heating season
In this hypothetical example, the mini-split reduces electricity spending for that heating load by about $490.
But several assumptions matter.
The calculation assumes both systems deliver the same useful heat, the mini-split maintains a seasonal COP of 2.5, and the electricity rate remains constant.
It excludes installation costs, maintenance, financing, and changes in household heating habits.
It also doesn’t represent heating the entire 2,000-square-foot house.
What if the seasonal COP is lower?
Using the same heating requirement and electricity price:
| Seasonal average COP | Electricity needed | Seasonal cost | Savings vs resistance heating |
|---|---|---|---|
| 1.5 | 3,200 kWh | $544 | $272 |
| 2.0 | 2,400 kWh | $408 | $408 |
| 2.5 | 1,920 kWh | $326 | $490 |
| 3.0 | 1,600 kWh | $272 | $544 |
The table demonstrates why local climate and actual equipment performance matter.
These COP values are illustrative assumptions, not guaranteed seasonal ratings.
What about replacing natural gas heating?
Savings are less predictable.
Natural gas costs are usually expressed in dollars per therm. One therm contains approximately 100,000 BTU of energy.
To compare gas heating with a mini-split, account for:
- Your delivered natural gas price per therm.
- Your furnace or boiler efficiency.
- Your electricity rate.
- Expected mini-split performance.
- Any fixed utility charges that remain.
For example, assume natural gas costs $1.50 per therm and an existing furnace operates at 90% efficiency.
One therm provides approximately:
100,000 × 0.90 = 90,000 BTU of useful heat.
That equals approximately 26.4 kWh of useful thermal energy.
The gas heating cost is therefore about:
$1.50 ÷ 26.4 = $0.057 per useful kWh of heat
A heat pump operating at COP 2.5 with electricity costing $0.17/kWh has an approximate heating cost of:
$0.17 ÷ 2.5 = $0.068 per useful kWh of heat
Under these assumptions, gas heating has the lower energy cost.
Different utility rates or heat pump performance could reverse the result.
How to use your actual electricity rate
Find the electricity charges and total kWh used on your latest utility bill.
For a basic comparison, divide the applicable electricity charges by the billed kWh.
Be aware that:
- Fixed monthly fees may not change when you use more electricity.
- Time-of-use plans charge different rates at different hours.
- Tiered pricing may make additional electricity more expensive.
- Delivery charges and taxes can affect the total.
For more accurate estimates, use the marginal rate—the price of the additional electricity your mini-split is expected to consume.
The US Energy Information Administration publishes electricity price information that can help with preliminary planning.
Related reading: How to Read Your Electric Bill and Find Hidden Costs
How to Choose the Right Mini-Split Size
Bigger isn’t always better.
An oversized mini-split may cycle inefficiently, provide uneven comfort, or struggle with humidity control under some conditions.
An undersized unit may run continuously without meeting the home’s heating or cooling needs during extreme weather.
Mini-split for one room: What size do you need?
Room area is a useful starting point, but it isn’t enough for final equipment selection.
The following table provides rough screening ranges only.
| Room size | Preliminary cooling capacity |
|---|---|
| 150–300 sq ft | 6,000–9,000 BTU/h |
| 300–500 sq ft | 9,000–12,000 BTU/h |
| 500–750 sq ft | 12,000–18,000 BTU/h |
| 750–1,000 sq ft | 18,000–24,000 BTU/h |
Actual requirements can differ significantly.
A sunny room with large west-facing windows may need more cooling than a shaded room of the same size.
Insulation, air leakage, ceiling height, occupancy, internal heat gains, and climate also matter.
Why professional load calculations matter
HVAC contractors commonly use ACCA Manual J, a residential heating and cooling load calculation method.
A load calculation considers the building’s characteristics and local design temperatures.
Ask your contractor to explain the calculated heating and cooling loads before recommending equipment.
For a mini-split, also compare the system’s minimum and maximum output.
Variable-speed equipment can operate across a range of capacities, which helps it match changing demand.
However, a unit’s advertised nominal capacity doesn’t necessarily describe its output at extreme outdoor temperatures.
What about whole-home mini-splits?
Whole-home ductless installations require more planning.
Bedrooms with closed doors, hallways, and separated living areas can make air distribution difficult.
One large indoor unit doesn’t automatically provide comfortable temperatures throughout an entire house.
Several smaller zones or a combination of ductless and short-ducted indoor units may work better.
The appropriate design depends on the floor plan, building envelope, and household preferences.
Mini-Split Performance by Climate
Climate can significantly affect mini-split comfort and operating costs.
A system that’s a good choice in a mild coastal region may not be the best choice for a home experiencing prolonged subzero weather.
Hot, humid South
In states such as Florida, Louisiana, and much of the Gulf Coast, humidity control is particularly important.
Mini-splits remove moisture while cooling, but dehumidification depends on equipment sizing, run time, airflow, and operating conditions.
An oversized system may not manage humidity as effectively as a properly sized one.
Homeowners should also inspect drainage regularly.
Poor condensate drainage can contribute to water damage and microbial growth.
Cold Northern states
Cold-climate heat pumps can provide heating at temperatures well below freezing.
However, heating capacity and efficiency generally decline as outdoor temperatures fall.
Some systems are designed to maintain substantial heating output at very low temperatures, but specifications vary.
In areas with severe winters, discuss:
- Heating capacity at local design temperatures
- Defrost operation
- Outdoor unit snow clearance
- Backup heating requirements
- Expected winter electricity costs
Existing gas furnaces or other heating systems may remain useful as backup or supplemental heating, depending on the design.
Dry Western states
In dry climates, humidity removal may be less important than cooling capacity and electricity costs.
A mini-split can be attractive where summer afternoons are hot but nights are relatively cool.
However, dust and airborne debris can accumulate on filters and outdoor coils.
Regular inspections are especially useful in dusty locations.
Coastal regions
Salt-laden air can accelerate corrosion.
Ask contractors about equipment suitability for coastal installations and manufacturer-recommended maintenance.
Outdoor placement should also account for prevailing winds and exposure.
Mixed climates
Areas with warm summers and moderately cold winters often offer favorable conditions for heat pumps.
Still, compare heating and cooling demand separately.
A mini-split selected only for peak summer cooling may not meet winter heating needs without supplemental equipment.
Pros and Cons of Ductless Mini-Splits
Mini-splits offer several practical advantages, but they also have limitations.
Advantages
1. No traditional ductwork
This makes installation possible in many homes where adding ducts would be disruptive or expensive.
2. Heating and cooling in one system
A heat pump mini-split can replace separate room heaters and air conditioners.
3. Individual temperature control
Separate indoor units allow occupants to adjust temperatures in different zones.
4. Efficient part-load operation
Variable-speed compressors can reduce output when full capacity isn’t needed.
5. Flexible installation
Indoor units can serve additions, converted garages, finished basements, and other challenging spaces.
6. Reduced duct-related losses
Because ductless systems don’t rely on conventional air distribution ducts, they avoid energy losses associated with those ducts.
Disadvantages
1. Higher upfront cost than many window units
Professional installation can cost several thousand dollars.
2. Visible indoor equipment
Wall-mounted units don’t match every homeowner’s design preferences.
3. Multiple rooms may need multiple units
Closed-off floor plans can require additional equipment.
4. Maintenance is still necessary
Filters, coils, drainage systems, and outdoor equipment need regular attention.
5. Cold-weather performance varies
Not every mini-split is designed for severe winter conditions.
6. Repairs can be expensive
Specialized components, electronic controls, and refrigerant-system repairs may require qualified technicians.
Are mini-splits worth it?
They’re often worth considering when they solve a specific comfort problem or replace inefficient equipment.
For example, installing a mini-split in an addition may be more practical than extending existing ductwork.
Replacing working central HVAC equipment solely to install ductless units may offer a less compelling financial case.
The best choice balances purchase price, operating costs, comfort, maintenance, and expected equipment life.
Installation: What Homeowners Should Expect
Mini-split installation is generally a professional HVAC project.
Even systems marketed as simplified installations may involve electrical work, refrigerant-related requirements, or local permit restrictions.
Typical installation process
Step 1: Home assessment
A contractor evaluates room dimensions, insulation, windows, electrical availability, and heating and cooling requirements.
Step 2: Equipment selection
The contractor recommends suitable capacity, efficiency, configuration, and indoor unit locations.
Step 3: Outdoor unit placement
The installer selects an appropriate location with adequate airflow, drainage, clearance, and service access.
Step 4: Indoor unit mounting
Indoor equipment is installed according to manufacturer specifications.
Step 5: Connections
Qualified technicians install refrigerant piping, drainage components, electrical connections, and controls.
Step 6: Testing and commissioning
The contractor verifies system operation, refrigerant-system integrity, drainage, airflow, and control settings.
Commissioning means checking and adjusting equipment to confirm it operates as intended.
How long does installation take?
A straightforward single-zone installation may take approximately one day.
More complicated projects can require several days.
Multi-zone systems, electrical upgrades, difficult access, and permit scheduling may extend the timeline.
DIY-safe preparation before installation
Homeowners can reduce surprises without performing technical installation work.
- Measure the room’s length, width, and ceiling height.
- Note rooms that feel unusually hot or cold.
- Identify major sources of sunlight and drafts.
- Photograph possible indoor and outdoor equipment locations.
- Check whether the proposed outdoor location is accessible for maintenance.
- Review household preferences for noise, appearance, and temperature control.
- Ask contractors for written load calculations and itemized quotes.
Do not drill refrigerant-line openings, modify electrical circuits, connect refrigerant piping, or attempt system charging without appropriate professional qualifications.
These tasks can involve electrical shock hazards, refrigerant exposure, property damage, and code violations.
How to Reduce Mini-Split Running Costs
Buying efficient equipment helps, but everyday operation and home conditions also affect electricity consumption.
1. Choose reasonable temperature settings
During summer, avoid setting the thermostat much colder than necessary.
During winter, avoid unnecessarily high indoor temperatures.
Every home is different, so prioritize comfort while making small adjustments.
For example, raising your cooling setting from 72°F to 76°F may reduce cooling demand, although actual savings depend on weather and building conditions.
2. Avoid unnecessary extreme setbacks
Variable-speed mini-splits often work efficiently when maintaining relatively stable indoor temperatures.
Large temperature setbacks can sometimes force the system to operate at higher output during recovery.
However, moderate setbacks may still save energy during long unoccupied periods.
Follow manufacturer guidance and experiment with settings rather than assuming one schedule works everywhere.
3. Clean accessible filters
Dirty filters can restrict airflow and reduce performance.
Check the owner’s manual for recommended cleaning intervals.
Some homes need more frequent cleaning because of pets, dust, or heavy use.
Always switch the equipment off before removing accessible filters.
Do not reach into electrical compartments or attempt to clean inaccessible internal components.
4. Improve insulation and air sealing
A mini-split doesn’t eliminate heat gain or heat loss through the building envelope.
Poor attic insulation, drafty doors, and leaky windows can increase operating hours.
Air sealing and appropriate insulation improvements may reduce the heating and cooling load.
This can sometimes allow smaller replacement equipment when improvements are completed before HVAC sizing.
Related reading: Attic Insulation Cost and Energy Savings Guide
5. Reduce solar heat gain
Window shades, exterior shading, and suitable window coverings can help reduce summer heat gain.
West-facing windows are often particularly challenging during hot afternoons.
Replacing windows isn’t always the most economical first step.
Start by evaluating shading, air leakage, and existing window condition.
6. Use scheduling and controls thoughtfully
Many mini-splits include programmable controls, Wi-Fi connectivity, or app-based scheduling.
Some systems support compatible smart-home integrations.
However, conventional smart thermostats aren’t universally compatible with mini-splits.
Before purchasing controls, verify compatibility with the exact equipment model.
7. Keep outdoor airflow unobstructed
Leaves, vegetation, snow, and debris can interfere with outdoor airflow.
Maintain manufacturer-required clearances.
During winter, inspect for snow accumulation around the unit without touching moving parts or attempting to remove ice from internal components.
Persistent icing or unusual operation should be evaluated by a technician.
Mini-Splits for Renters and Apartments
Traditional mini-splits aren’t usually practical for renters because installation requires permanent modifications.
A typical installation involves mounting equipment, creating a wall penetration, and providing electrical connections.
Those changes generally require property-owner approval.
Can renters install a mini-split?
Possibly, but only with written permission and any required building approvals.
Apartment buildings and condominiums may also have restrictions involving:
- Exterior equipment placement
- Noise
- Building appearance
- Electrical systems
- Wall penetrations
- Shared property
- Permits
Before making plans, review the lease and contact the property owner or building manager.
Renter-friendly alternatives
Window air conditioners
Window units can provide relatively affordable room cooling where installation is permitted.
Choose an appropriately sized, efficient model and follow manufacturer mounting instructions.
Portable air conditioners
Portable ACs may work where window units aren’t allowed, but efficiency and performance vary.
Dual-hose designs can avoid some of the negative indoor pressure effects associated with single-hose models.
Window heat pumps
Certain window-mounted heat pump products can provide both heating and cooling without a conventional mini-split installation.
Check electrical requirements, building rules, and cold-weather specifications.
Fans and window coverings
Fans improve perceived comfort by moving air but don’t lower room temperature on their own.
Shades and curtains can reduce solar heat gain.
A note about portable electric heaters
Portable resistance heaters generally use about one kWh of electricity for every kWh of heat they deliver.
They can be useful for limited supplemental heating, but frequent operation may be expensive.
Follow the manufacturer’s safety instructions, plug heaters directly into suitable wall outlets, and keep them away from combustible materials.
Never use extension cords or power strips with portable space heaters.
Rebates, Maintenance, and Long-Term Costs
The lowest installation quote isn’t always the least expensive option over time.
Operating efficiency, repair costs, maintenance, and warranty coverage all influence ownership costs.
Mini-split rebates in 2026
Some state agencies and electric utilities offer incentives for qualifying heat pumps.
Eligibility may depend on:
- Household income
- Equipment efficiency
- Existing heating fuel
- Contractor qualifications
- Installation location
- Program funding and availability
Federal residential energy tax credits under Sections 25C and 25D ended for expenditures after December 31, 2025. Homeowners should not assume a new mini-split installation in 2026 qualifies for those credits.
Current state, local, and utility incentives may still be available.
Check:
- ENERGY STAR Rebate Finder
- Database of State Incentives for Renewables & Efficiency
- Your state energy office
- Your electricity provider
Programs vary by state and change often. Check current eligibility, equipment requirements, and application deadlines before making a purchase.
Annual maintenance costs
Professional maintenance prices vary.
For preliminary budgeting, a homeowner might allow approximately $100–$300 or more per service visit, depending on location, service scope, and the number of units.
Some systems or maintenance agreements cost more.
Routine professional service may include:
- Indoor and outdoor coil inspection
- Drainage inspection
- Electrical connection checks
- Airflow evaluation
- Operating performance checks
- Cleaning where necessary
Homeowners can generally clean accessible filters according to the manual.
Refrigerant-system work and electrical repairs belong to qualified professionals.
How long do mini-splits last?
A commonly used planning range is approximately 12–20 years, although individual systems may fail earlier or operate longer.
Service life depends on installation quality, climate, usage, maintenance, and equipment design.
Coastal corrosion, heavy operating demand, and poor maintenance can shorten equipment life.
Should you buy an extended warranty?
Read the standard manufacturer warranty first.
Check what it covers, exclusions, labor coverage, registration requirements, and whether professional installation is required.
An extended warranty or service agreement may provide value in some situations, but compare its price and exclusions carefully.
Don’t assume every repair will be covered.
Estimating simple payback
A basic payback calculation is:
Simple payback = Additional upfront cost ÷ Annual operating savings
Suppose a mini-split installation costs $4,500 and the homeowner expects $450 in annual energy savings compared with their existing equipment.
$4,500 ÷ $450 = 10 years
However, this simplified calculation assumes the alternative requires no upfront spending.
For a replacement decision, compare the incremental cost of the mini-split with the cost of the alternative system.
For example, if the mini-split costs $4,500 and another suitable replacement costs $2,500, the additional investment is $2,000.
At $450 in annual savings:
$2,000 ÷ $450 ≈ 4.4 years
Neither result is a guaranteed payback period.
Actual results depend on maintenance, repairs, energy prices, changing usage, and equipment performance.
When to Call a Professional
Some mini-split problems can be resolved through basic maintenance or control adjustments.
Others require professional diagnosis.
Call a licensed HVAC technician when:
- The system repeatedly shuts down or displays fault codes.
- Heating or cooling performance drops significantly.
- Indoor equipment leaks water.
- Unusual grinding, rattling, or electrical noises occur.
- Ice repeatedly accumulates where the manufacturer doesn’t consider it normal.
- Refrigerant leakage is suspected.
- The system needs to be relocated.
- Internal components require cleaning or repair.
Never open refrigerant connections or attempt to recharge a mini-split yourself.
Refrigerants require appropriate handling, and some newer refrigerants have specific flammability classifications that affect installation and service requirements.
Call a licensed electrician when:
- A new dedicated circuit is needed.
- The electrical panel requires modification.
- Breakers repeatedly trip.
- Wiring appears damaged.
- Electrical connections need repair.
If you notice burning smells, smoke, or signs of overheating, stop using the equipment and seek qualified assistance.
What about carbon monoxide?
An all-electric mini-split doesn’t produce carbon monoxide through combustion.
However, homes with gas furnaces, fireplaces, gas water heaters, or other fuel-burning appliances still need appropriate carbon monoxide protection.
Follow local alarm requirements and manufacturer instructions.
A mini-split installation doesn’t replace the need to maintain existing combustion appliances safely.
Common Mistakes to Avoid
1. Buying equipment based only on square footage
Room area doesn’t capture insulation, solar exposure, air leakage, or local climate.
Use a professional heating and cooling load calculation for final sizing.
2. Choosing the cheapest installation quote
A low quote may exclude electrical work, permits, drainage components, or proper commissioning.
Compare project scope as carefully as price.
3. Assuming every mini-split performs well in extreme cold
Cold-weather heating capacity varies substantially between models.
Review published performance specifications at relevant outdoor temperatures.
4. Installing one unit for several closed-off rooms
Air doesn’t always move effectively between rooms with closed doors.
Evaluate individual room loads and airflow before choosing a system layout.
5. Ignoring humidity
In humid climates, equipment sizing and moisture removal are important.
Oversizing can contribute to comfort problems.
6. Neglecting filter and drainage maintenance
Restricted airflow and blocked drains can cause performance problems or water damage.
Follow the manufacturer’s maintenance schedule.
7. Expecting identical savings in every home
Electricity rates, existing heating fuel, climate, and usage determine whether operating costs decrease.
Compare actual energy costs rather than relying on advertised savings claims.
8. Forgetting future service access
Outdoor and indoor units need adequate clearance for maintenance.
Difficult access can make future repairs more expensive.
Frequently Asked Questions
1. How much does a ductless mini-split cost for a 1,500-square-foot house?
A whole-home ductless system for a 1,500-square-foot house might cost approximately $8,000–$18,000 or more, depending on layout, climate, and the number of indoor units.
However, square footage alone isn’t enough to estimate equipment needs.
An open floor plan may require fewer indoor units than a house with several separated bedrooms.
Get a professional load calculation and itemized installation quotes.
2. How much does it cost to run a mini-split 24 hours a day?
It depends on average electricity consumption.
For example, at an average demand of 0.5 kW and an electricity rate of $0.17/kWh:
0.5 × 24 × $0.17 = $2.04 per day.
Over 30 days, that equals approximately $61.
Actual demand changes with temperature, system size, insulation, and operating conditions. A running inverter system doesn’t necessarily consume its maximum rated power continuously.
3. Are mini-splits cheaper to run than central air conditioning?
They can be, particularly when cooling a limited area or avoiding losses from poorly sealed ducts.
However, an efficient central air conditioner connected to well-designed ducts may have competitive operating costs.
Compare equipment efficiency, total conditioned area, climate, electricity rates, and expected usage.
A multi-zone mini-split isn’t automatically cheaper to operate than central air.
4. Can one mini-split cool an entire house?
Sometimes, but it depends on the home’s size and layout.
One indoor unit may serve a small, open living area effectively.
Larger houses with multiple closed-off rooms usually need additional indoor units or another distribution strategy.
Proper sizing and airflow planning are essential for consistent comfort.
5. Do mini-splits work below freezing?
Yes. Many heat pump mini-splits operate below 32°F, and some cold-climate models are designed for much lower temperatures.
However, heating capacity and efficiency change as outdoor temperatures fall.
Check the manufacturer’s published heating output at temperatures relevant to your location.
In very cold regions, supplemental or backup heating may be appropriate.
6. Is a mini-split better than a window AC?
A mini-split may offer quieter indoor operation, efficient variable-speed cooling, and heating capability.
It also avoids occupying a window opening.
However, professionally installed mini-splits cost substantially more upfront.
A window air conditioner may be the more economical choice for occasional cooling, short-term housing, or renters who cannot make permanent modifications.
7. How many mini-splits do I need for three bedrooms?
Three bedrooms don’t automatically require three separate outdoor units.
Possible configurations include individual single-zone systems, a multi-zone system with three indoor units, or a different layout depending on the building.
Each bedroom’s load, door usage, and heating needs matter.
A qualified contractor can compare configurations and explain the tradeoffs.
8. Do mini-splits increase home value?
They may improve comfort and appeal, particularly in homes without central cooling or in markets where efficient heating and cooling are desirable.
However, resale value depends on local buyer preferences, system quality, age, and installation appearance.
There isn’t a reliable universal percentage of installation cost that homeowners can expect to recover.
Treat resale value as a possible benefit rather than a guaranteed return.
9. Are mini-splits noisy?
Many modern mini-splits operate quietly at low fan and compressor speeds.
However, noise levels vary by model, operating mode, and installation.
Compare manufacturer sound ratings, usually expressed in decibels (dB), and consider both indoor and outdoor placement.
Outdoor units near bedroom windows or neighboring properties deserve particular attention.
10. Can I install a mini-split myself?
Some products are marketed for simplified installation, but local regulations, electrical requirements, refrigerant rules, and warranty conditions still apply.
A conventional mini-split installation typically requires qualified HVAC and electrical professionals.
Homeowners can safely research equipment, prepare access areas, and compare quotes.
Do not attempt electrical panel work, refrigerant handling, or unqualified hardwired installation.
11. Is it cheaper to leave a mini-split running all day?
Not necessarily.
Variable-speed mini-splits can operate efficiently while maintaining relatively stable temperatures.
However, reducing heating or cooling during long unoccupied periods can still save energy.
The best schedule depends on climate, building insulation, occupancy, and equipment behavior.
Try modest adjustments and monitor energy use rather than assuming continuous operation or large setbacks always cost less.
12. How often should a ductless mini-split be serviced?
Check accessible filters regularly and follow the manufacturer’s cleaning instructions.
Many homeowners schedule professional maintenance approximately once a year, although heavily used systems or manufacturer requirements may justify more frequent service.
Professional inspections help identify drainage problems, airflow restrictions, electrical issues, and declining performance.
Maintenance needs vary by environment and system design.
Conclusion: Is a Ductless Mini-Split Right for Your Home?
A ductless mini-split can be an effective way to heat and cool individual rooms, additions, and homes without traditional ductwork.
For many households, the biggest advantages are flexible installation, room-by-room temperature control, and efficient heating and cooling.
However, ductless mini split cost should be evaluated alongside long-term electricity use, maintenance, climate performance, and installation requirements.
A system that saves money compared with electric resistance heating may not produce the same savings when replacing an efficient natural gas furnace or central heat pump.
Final decision checklist
Before purchasing, confirm that you have:
- Identified which rooms need heating or cooling.
- Checked insulation, drafts, and window conditions.
- Requested a professional heating and cooling load calculation.
- Compared single-zone and multi-zone options.
- Reviewed SEER2, HSPF2, and cold-weather performance.
- Estimated operating costs using your actual electricity rate.
- Obtained multiple written installation quotes.
- Checked current state and utility rebates.
- Reviewed warranty and maintenance requirements.
- Confirmed electrical, drainage, and permitting needs.
The most useful next step is to compare the cost of a properly sized mini-split with the cost of repairing or replacing your existing heating and cooling equipment.
That comparison will reveal whether a ductless system makes sense for your particular home—not just whether the technology is efficient.
Pingback: Air Sealing Guide: How to Find and Fix Air Leaks in Your Home – Energy Savings Perlon