Your home may be wasting energy in places you rarely notice: around windows, beneath exterior doors, inside poorly insulated walls, or through heating and cooling equipment that isn’t operating efficiently.
You don’t necessarily need expensive equipment or a contractor to identify the first signs of these problems.
Read Also: How to Lower Your Electric Bill: 35 Proven Ways (Room-by-Room Checklist)
A DIY home energy audit is a practical way to examine how your home uses energy, identify potential trouble spots, and decide which improvements deserve attention.
Whether you own a 2,000-square-foot house or rent a small apartment, many useful checks take only a few minutes.
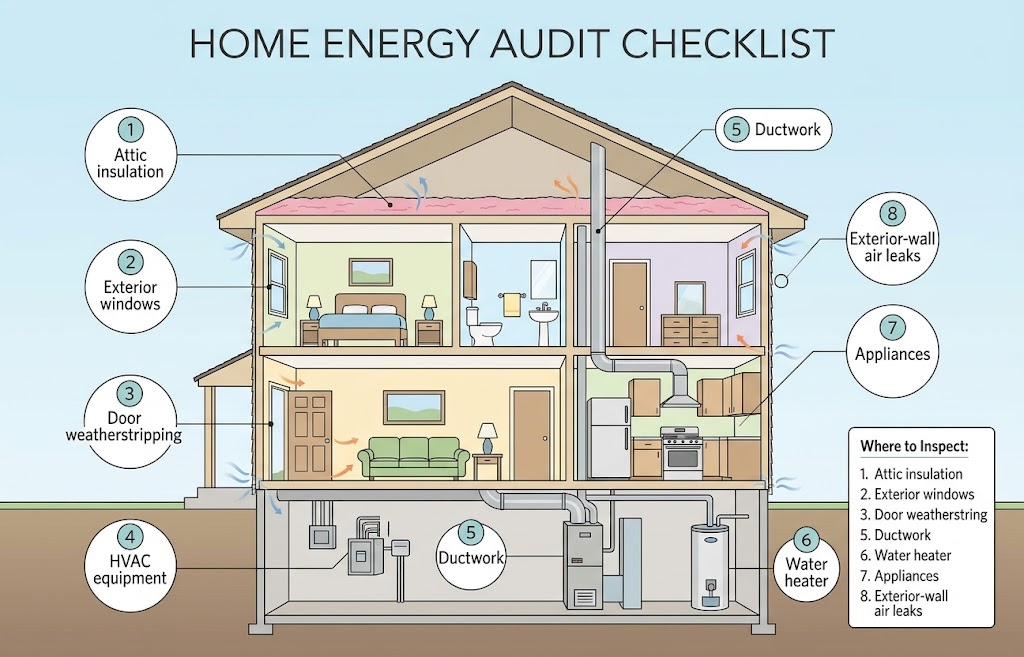
This guide walks you through a room-by-room assessment, including air leaks, insulation, HVAC equipment, lighting, appliances, and water heating.
You’ll also learn which tools are worth buying, how to estimate potential savings, and when a professional assessment—including a blower door test—may provide better answers.
Read Also: How to Read Your Electric Bill: kWh, Delivery Charges, and Rates Explained
Quick Takeaways
- A DIY energy audit helps identify possible sources of energy waste without opening walls or working on electrical equipment.
- Start with your electricity and heating bills to establish a baseline before making changes.
- Windows, doors, attic access points, and accessible exterior-wall penetrations are common places to check for air leaks.
- Insulation problems can increase heating and cooling demand, but some defects are impossible to confirm without professional testing.
- Dirty HVAC filters, poor thermostat schedules, and inefficient appliances may contribute to unnecessary energy consumption.
- Basic audit supplies can cost roughly $0–$75, depending on what you already own.
- Professional energy assessments may include blower door testing, infrared imaging, and combustion-safety checks.
- Utility energy audit programs sometimes provide discounted assessments or efficiency improvements; availability varies by location.
What Is a Home Energy Audit?
A home energy audit, also called a home energy assessment, is an evaluation of how a home consumes energy and where improvements might reduce unnecessary use.
The goal is to understand how different parts of the building work together.
Your heating system, insulation, windows, ventilation, appliances, and daily habits all influence energy consumption.
For example, an efficient air conditioner may still use more electricity than expected if the home has significant air leakage or insufficient insulation.
Likewise, replacing windows might provide limited financial savings if most unwanted heat transfer occurs through an underinsulated attic.
An energy assessment helps identify these relationships before you spend money on improvements.
What Can a DIY Energy Audit Find?
A homeowner or renter can often identify:
- Noticeable drafts around windows and doors
- Missing or damaged weatherstripping
- Visible insulation gaps
- Dirty or improperly fitted HVAC filters
- Blocked heating and cooling vents
- Unnecessary lighting and standby electricity use
- Inefficient thermostat schedules
- Accessible hot-water leaks
- Unexplained changes in utility consumption
These observations provide useful starting points.
However, they don’t always reveal the underlying cause of a problem.
A cold wall might indicate missing insulation, air leakage, thermal bridging, or simply normal temperature differences.
Thermal bridging occurs when heat travels through a material, such as wood framing, that conducts heat more readily than the surrounding insulation.
Professional testing may be needed to distinguish between these possibilities.
Read Also: How to Read Your Electric Bill: kWh, Delivery Charges, and Rates Explained
What a DIY Audit Cannot Reliably Determine
A visual inspection generally cannot measure a home’s total air leakage or verify hidden insulation conditions.
It also cannot establish whether combustion appliances are operating safely.
Professional auditors may use specialized equipment to evaluate these issues.
The US Department of Energy’s Home Energy Assessments guide explains both homeowner assessments and professional testing.
The most useful approach is to treat your DIY findings as evidence—not as a final diagnosis.
DIY vs. Professional Energy Audit
A DIY assessment and a professional audit serve related but different purposes.
The DIY approach is inexpensive and helps you identify obvious issues.
A professional assessment can provide measurements, diagnostic testing, and recommendations for problems that aren’t visible.
DIY vs. Professional Energy Audit Comparison
| Feature | DIY Energy Audit | Professional Energy Audit |
|---|---|---|
| Typical cost | $0–$75 for basic supplies | Often roughly $200–$600 or more |
| Time required | 1–3 hours for an initial review | Commonly 2–4 hours |
| Utility bill review | Yes | Usually |
| Visual air leak inspection | Yes | Yes |
| Basic insulation observations | Yes | Yes |
| Blower door testing | No | Sometimes included |
| Infrared imaging | Optional handheld tool, limited interpretation | May be included |
| Combustion-safety testing | No | May be included |
| HVAC system evaluation | Basic observations | More detailed assessment |
| Written improvement recommendations | Your own checklist | Often provided |
These cost and time ranges are planning estimates, not national averages. Actual prices depend on location, property size, testing scope, and local utility programs.
Some utility-sponsored assessments cost less than independently purchased services.
Others provide only a basic walkthrough rather than comprehensive diagnostic testing.
Which Should You Choose First?
A DIY assessment makes sense when:
- Your energy bills are relatively stable.
- You want to identify low-cost improvements.
- You haven’t checked weatherstripping or filters recently.
- You’re deciding whether a professional audit is necessary.
A professional assessment may be more useful when:
- Heating or cooling costs remain unusually high.
- Rooms have persistent temperature differences.
- You suspect significant hidden air leakage.
- You’re planning major insulation or HVAC upgrades.
- Moisture problems or ventilation concerns complicate the situation.
If you’re considering replacing an expensive heating or cooling system, a more complete building assessment may help avoid choosing equipment based on incorrect assumptions.
Before making that decision, start with the information already available: your utility bills.
Tools You’ll Need
You can complete a useful DIY home energy audit with supplies you probably already own.
Specialized equipment can help, but it’s not essential for the initial inspection.
Basic Energy Audit Tools
| Tool | Typical Budget | Purpose |
|---|---|---|
| Flashlight | $0–$20 | Inspect accessible dark areas |
| Notebook or phone | $0 | Record observations |
| Measuring tape | $5–$15 | Measure visible insulation depth or gaps |
| Digital thermometer | $10–$25 | Compare room temperatures |
| Plug-in electricity monitor | $20–$40 | Measure compatible appliance electricity use |
| Infrared thermometer | $15–$40 | Check surface temperatures |
| Basic weatherstripping supplies | $10–$30 | Address suitable minor gaps |
Prices are illustrative retail ranges and can vary.
You don’t need to purchase everything.
A flashlight, recent utility bills, and a phone camera are enough to begin.
Are Thermal Cameras Worth Buying?
An infrared thermal camera displays differences in surface temperature.
These images can help identify areas that may deserve closer inspection.
However, a cold-looking spot does not automatically prove that insulation is missing.
Sun exposure, reflective surfaces, moisture, and temperature differences can affect results.
Infrared thermometers are even more limited because they measure surface temperature at a particular spot rather than producing a detailed image.
For occasional use, borrowing or renting appropriate equipment may be more sensible than buying it.
Basic Safety Preparation
Perform your inspection during daylight when possible.
Keep children and pets away from work areas.
Do not remove electrical covers, open utility meters, or inspect energized wiring.
Avoid entering crawl spaces or attics with uncertain flooring, exposed electrical hazards, signs of pests, suspected asbestos-containing materials, or other unsafe conditions.
A useful audit should not require putting yourself at risk.
Step 1: Review Your Energy Bills
Your utility bills provide the starting point for measuring whether future changes make a difference.
Collect approximately 12 months of electricity bills if available.
If your home uses natural gas, heating oil, or propane, include those records as well.
Find Your Electricity Consumption
Look for the number labeled kWh.
A kilowatt-hour (kWh) measures electrical energy consumption.
For example, a 1,000-watt appliance operating for one hour uses approximately 1 kWh.
Compare your monthly kWh consumption rather than looking only at the total dollar amount.
Electricity prices, fixed charges, and billing periods can change.
Check Natural Gas Use
Natural gas bills commonly measure consumption in therms.
One therm represents 100,000 British thermal units (Btu) of energy.
A Btu is a unit used to measure heat energy.
Gas consumption can increase substantially during heating season if your home uses a gas furnace or boiler.
Water heating and cooking may also contribute.
Calculate Average Daily Use
Different billing periods can make monthly comparisons misleading.
Use:
Average daily kWh = Total kWh ÷ Billing days
Example:
900 kWh ÷ 30 days = 30 kWh per day
If another bill shows 980 kWh over 35 days:
980 ÷ 35 = 28 kWh per day
Total consumption increased, but average daily electricity use decreased.
Look for Seasonal Patterns
Ask yourself:
- Does electricity use rise sharply in summer?
- Does natural gas use increase in winter?
- Did consumption change after buying an appliance?
- Did your household schedule change?
- Are there unusual spikes unrelated to weather?
Don’t assume every increase indicates an equipment problem.
Weather, billing adjustments, occupancy, and rate changes can all affect the numbers.
For a more detailed explanation, see How to Read Your Electric Bill: kWh, Delivery Charges, and Rates Explained.
Record your current monthly usage before starting improvements. That baseline makes it easier to evaluate results later.
Step 2: Find Air Leaks Around Your Home
Air leakage occurs when outdoor air enters a home or conditioned indoor air escapes through unintended gaps.
These leaks can increase heating and cooling demand and make rooms less comfortable.
The Department of Energy identifies air sealing as an important part of improving home energy efficiency.
Where to Look for Air Leaks
Start with accessible locations:
- Exterior doors and door frames
- Window frames and movable sashes
- Baseboards along exterior walls
- Attic access hatches
- Accessible gaps around plumbing penetrations
- Areas where cables enter exterior walls
- Fireplace surrounds
- Accessible duct connections
Some gaps are easy to spot.
Others become noticeable only when outdoor temperatures differ significantly from indoor temperatures.
How to Check for Drafts
Close exterior doors and windows.
On a windy day, slowly move your hand near suspected gaps.
You may feel air movement around poorly sealed openings.
Look for visible daylight beneath doors or around damaged weatherstripping.
A thin sheet of tissue can sometimes indicate air movement near a gap, although indoor air currents can produce misleading results.
Avoid using candles, matches, incense, or other open flames to locate leaks.
They create unnecessary fire risk and can be affected by ordinary room airflow.
What Can You Fix Yourself?
Minor, accessible gaps around suitable door and window frames may be addressed with weatherstripping or appropriate caulk.
Choose products compatible with the materials and intended location.
Weatherstripping is generally used where components move, such as operable doors and windows.
Caulk is generally used for suitable stationary joints.
Do not seal:
- Required ventilation openings
- Combustion-air inlets
- Appliance exhaust outlets
- Bathroom or kitchen exhaust terminations
- Window drainage openings
- Openings required by building or fire codes
Why Air Sealing Requires Care
A tighter home may need better-controlled ventilation.
Reducing uncontrolled air leakage is useful, but excessively restricting fresh air can contribute to indoor air quality problems.
Homes with fuel-burning equipment require particular care because pressure differences can affect combustion and exhaust venting.
If significant air sealing is planned, professional ventilation and combustion-safety evaluation may be appropriate.
For additional guidance, consult DOE’s Air Sealing Your Home resource.
Step 3: Check Insulation and Attic Conditions
Insulation slows heat transfer between your living space and the outdoors.
Poor insulation can contribute to uncomfortable rooms and increased heating or cooling costs.
However, insulation is only part of the building envelope.
Air leakage, moisture, and ventilation also affect performance.
Understanding R-Value
Insulation performance is commonly described using R-value.
R-value measures resistance to heat flow.
Higher R-values generally indicate greater insulating resistance.
The appropriate insulation level depends on climate, building design, existing insulation, and applicable building requirements.
For example, an attic in a cold Northern climate may need a different insulation strategy than one in a hot Southern climate.
How to Check Visible Attic Insulation
If you can safely observe insulation from an accessible attic opening, look for:
- Areas where insulation is missing
- Uneven insulation depth
- Compressed insulation
- Water stains
- Damp or visibly damaged material
- Large gaps around accessible openings
- Signs of animal activity
Do not step onto exposed ceiling drywall.
Attic floors may have open spaces between structural members, creating serious fall hazards.
Avoid disturbing unknown insulation materials.
Older homes may contain materials that require specialized assessment before work begins.
Why Insulation Depth Isn’t the Whole Story
Two insulation products with the same thickness may have different R-values.
Insulation performance also depends on proper installation.
Compressed batts, gaps, and air movement can reduce effectiveness.
If insulation is wet, identify and correct the moisture source before adding more material.
Installing insulation over an unresolved roof leak can conceal damage and worsen moisture problems.
What About Wall Insulation?
Wall insulation is harder to inspect without opening finished surfaces.
You may notice cold walls or temperature differences, but those observations don’t establish whether insulation is missing.
A professional energy auditor may use infrared imaging under suitable temperature conditions to identify patterns worth investigating.
For major improvements, an insulation contractor can evaluate appropriate materials, installation methods, and moisture-control requirements.
Step 4: Inspect Heating and Cooling Systems
Heating and cooling equipment can account for a substantial share of household energy consumption.
A basic HVAC inspection is one of the most useful parts of a home energy assessment.
You don’t need to open equipment cabinets or handle electrical components.
Focus on accessible maintenance items and operating patterns.
Check Your HVAC Filter
Inspect the air filter according to the equipment manufacturer’s instructions.
A clogged filter can restrict airflow and affect performance.
Replace or clean it as recommended.
Use a filter compatible with your system.
A filter with excessive airflow resistance may create problems if the HVAC system isn’t designed for it.
Check Supply and Return Vents
Supply vents deliver conditioned air to rooms.
Return vents move indoor air back toward the heating or cooling system.
Make sure furniture, curtains, and rugs aren’t blocking accessible vents.
Do not assume closing vents in unused rooms saves energy.
In some ducted systems, closing too many vents can increase pressure and reduce performance.
Review Thermostat Settings
Check whether your thermostat schedule matches your actual household routine.
For many systems, reducing unnecessary heating or cooling while the home is unoccupied may lower energy consumption.
Heat pumps require special consideration.
Some heat pump systems use supplemental electric resistance heat during certain operating conditions.
Aggressive thermostat changes may sometimes trigger additional resistance heating, offsetting expected savings.
Use settings appropriate for your equipment.
Why Your AC Runs Constantly
An air conditioner that operates for long periods during extreme heat isn’t necessarily malfunctioning.
However, persistent poor cooling, weak airflow, unusual noises, or rapidly increasing electricity consumption may indicate a problem.
Potential causes include:
- Dirty filters
- Airflow restrictions
- Duct leakage
- Inadequate insulation
- Equipment problems
- Improper system sizing
A licensed HVAC technician should diagnose mechanical, electrical, or refrigerant-related issues.
Should You Replace an Older HVAC System?
Age alone doesn’t determine whether replacement is worthwhile.
Compare maintenance history, operating performance, repair costs, equipment efficiency, and expected remaining service life.
For air conditioners and heat pumps, newer equipment commonly uses SEER2 ratings.
SEER2 stands for Seasonal Energy Efficiency Ratio 2, a standardized cooling-efficiency metric.
Higher SEER2 ratings generally indicate greater rated cooling efficiency under the applicable test conditions.
Actual savings still depend on weather, installation quality, ductwork, and household use.
A professional load calculation can help determine appropriate equipment capacity before replacement.
Step 5: Evaluate Windows and Doors
Windows and doors affect comfort through heat transfer, air leakage, and solar heat gain.
Solar heat gain is heat entering a home from sunlight.
A window receiving strong afternoon sun may contribute to cooling demand even if it seals properly.
Check Window Condition
Look for:
- Damaged weatherstripping
- Gaps around frames
- Difficulty closing or locking
- Visible moisture damage
- Condensation between glass panes
- Deteriorated exterior caulking
Condensation between panes of insulated glass can indicate a failed seal.
However, condensation on the room-facing surface may instead reflect indoor humidity and surface temperature.
Should You Replace Drafty Windows?
Not necessarily.
Sometimes, weatherstripping or repairing an existing window can address the main problem at substantially lower cost.
Full window replacement may be appropriate when units are damaged, difficult to operate, or approaching the end of their useful life.
But replacing functional windows solely for energy savings can involve a long payback period.
Compare installation costs and realistic energy savings estimates before deciding.
ENERGY STAR provides guidance on efficient windows and product selection.
Check Exterior Doors
Inspect weatherstripping around the door perimeter.
Look for gaps beneath the door.
A suitable door sweep may reduce drafts.
Also check whether the door closes securely against its seals.
Avoid modifications that interfere with safe entry, exit, or required ventilation.
Consider Window Coverings
Curtains, shades, and blinds can influence solar heat gain and comfort.
During hot weather, suitable window coverings may reduce unwanted sunlight entering the home.
In cold weather, some insulating window treatments can reduce heat transfer.
Results depend on window orientation, climate, product design, and how coverings are used.
Step 6: Check Appliances, Lighting, and Electronics
Appliances and electronics are another useful place to investigate energy consumption.
The goal isn’t necessarily to replace everything.
Instead, identify devices that consume substantial electricity and determine whether changes are worthwhile.
Identify High-Consumption Appliances
Common electricity users include:
- Electric clothes dryers
- Refrigerators and freezers
- Electric ovens
- Dishwashers
- Dehumidifiers
- Portable electric heaters
- Window air conditioners
- Electric vehicle chargers
Operating time matters as much as equipment wattage.
A relatively small device running continuously can consume meaningful electricity over a month.
Use a Plug-In Electricity Monitor
A compatible plug-in monitor can measure the electricity used by certain household devices.
For example, if a device consumes an average of 50 watts continuously:
50 watts ÷ 1,000 × 24 hours × 30 days = 36 kWh/month
At $0.17/kWh:
36 × $0.17 = $6.12/month
This is an illustrative calculation.
Only use monitors within their electrical ratings and according to manufacturer instructions.
Do not use them with incompatible high-load equipment.
Check Lighting
Replace frequently used incandescent or halogen bulbs with suitable LEDs when practical.
LEDs generally use less electricity to produce comparable light output.
Choose bulbs based on:
- Lumens, which measure visible light output
- Color temperature
- Fixture compatibility
- Dimmability
- Energy consumption
A bulb’s wattage tells you how much power it uses, not how bright it is.
Look for Standby Consumption
Some electronics consume electricity even when they appear switched off.
This is called standby power.
A plug-in monitor can help determine whether a particular device has meaningful standby consumption.
Don’t assume every device is worth unplugging.
Modern electronics vary, and some equipment needs continuous power for safety, connectivity, or proper operation.
For additional ideas, see How to Reduce Electricity Usage at Home: Practical Ways to Save.
Step 7: Review Water Heating and Hot Water Use
Water heating can contribute significantly to household energy consumption.
Whether your water heater uses electricity, natural gas, or another fuel, unnecessary hot-water use increases operating costs.
Check for Visible Leaks
Inspect accessible faucets and visible plumbing connections for dripping water.
Look for moisture around the water heater and nearby piping.
Do not remove water heater covers or work on electrical connections, gas lines, pressure-relief devices, or internal components.
If you notice active leakage, corrosion, or unusual equipment behavior, contact a qualified professional.
Review Water Heater Temperature
The Department of Energy notes that 120°F is a commonly recommended water heater setting for many households.
However, appropriate settings depend on equipment, household needs, manufacturer guidance, and health considerations.
Some homes require different temperature-management strategies, including measures to reduce bacterial growth and scalding risks.
Do not adjust unfamiliar controls or bypass safety devices.
Consider Hot Water Habits
Practical changes may include:
- Repairing dripping hot-water faucets
- Washing clothes in cold water when appropriate
- Using efficient showerheads
- Running full dishwasher loads
- Reducing unnecessary hot-water use
Actual savings depend on your water heater’s energy source and your household’s consumption.
Is a Heat Pump Water Heater Worth Considering?
Heat pump water heaters move heat from surrounding air into stored water.
They can use less electricity than conventional electric resistance water heaters under appropriate conditions.
However, they also affect the temperature and humidity of the surrounding space.
Installation requirements, available room volume, airflow, noise, climate, and hot-water demand should be evaluated before purchase.
A qualified installer can determine whether the location is suitable.
Step 8: Build Your Energy Improvement Plan
By this point, you may have identified several possible improvements.
The next step is prioritizing them.
Not every problem deserves immediate spending.
Sort Findings by Cost and Complexity
Use three categories.
Category 1: Low-cost improvements
Examples include suitable weatherstripping, thermostat scheduling, LED lighting, and routine filter replacement.
Category 2: Moderate improvements
Examples may include professional duct sealing, selected insulation upgrades, or equipment repairs.
Category 3: Major improvements
Examples include HVAC replacement, extensive insulation work, window replacement, or a new water heating system.
These categories are not strict price bands.
Costs depend on home size, equipment, local labor rates, and project scope.
Energy Audit Checklist
| Area | What to Check | Priority if Problem Found | DIY or Professional? |
|---|---|---|---|
| Utility bills | Seasonal spikes and unusual consumption | High | DIY |
| Exterior doors | Drafts and worn weatherstripping | Medium | Usually DIY |
| Windows | Air leaks and damaged seals | Medium | Depends on repair |
| Attic | Visible insulation gaps or moisture | High | Professional if access is unsafe |
| HVAC filters | Dirt and airflow restriction | Medium | Usually DIY |
| HVAC performance | Poor heating or cooling | High | Professional |
| Ductwork | Visible damage or disconnected sections | High | Professional |
| Lighting | Inefficient frequently used bulbs | Low–Medium | DIY |
| Appliances | Unusual electricity consumption | Medium | DIY assessment |
| Water heater | Leaks or poor performance | High | Professional |
| Ventilation | Moisture, odors, or stale air | High | Professional evaluation |
| Electrical equipment | Heat, buzzing, or repeated breaker trips | Urgent | Licensed electrician |
Prioritize Problems That Affect Safety
Electrical hazards, combustion problems, and active moisture damage take priority over energy savings.
A damp attic, for example, should not simply receive more insulation.
The moisture source must be identified and corrected.
Keep a Simple Improvement Log
Record:
- Date of inspection
- Problem observed
- Photos
- Estimated repair cost
- Work completed
- Utility consumption afterward
This helps you distinguish actual results from changes caused by weather or electricity prices.
Realistic Costs & Savings
The financial value of a home energy audit depends on what you find.
A household with significant air leakage may have more improvement potential than a newer, well-sealed home.
The following examples show how to estimate savings without assuming every project will deliver the same result.
DIY Audit Cost Breakdown
| Expense | Illustrative Cost |
|---|---|
| Flashlight and basic supplies | $0–$20 |
| Weatherstripping | $10–$30 |
| Caulk and application supplies | $10–$25 |
| Plug-in electricity monitor | $20–$40 |
| Optional infrared thermometer | $15–$40 |
| Basic DIY assessment | Approximately $0–$75 |
You can spend less by using existing tools and inspecting before purchasing materials.
The $0–$75 range covers a basic audit and modest supplies, not every optional device or repair listed.
Worked Example: Reducing Electricity Consumption
Assume:
- Home size: 2,000 sq ft
- Climate: Mixed heating and cooling
- Monthly electricity consumption: 1,000 kWh
- Marginal electricity rate: $0.17/kWh
- Electricity reduction after improvements: 50–100 kWh/month
The marginal rate is the amount the bill changes for each additional or avoided kWh under the applicable rate structure.
It may differ from the average all-in cost because fixed customer charges generally remain.
Savings formula:
Monthly kWh reduction × Marginal electricity rate = Estimated monthly savings
For 50 kWh:
50 × $0.17 = $8.50/month
For 100 kWh:
100 × $0.17 = $17/month
Annualized:
$8.50 × 12 = $102/year
$17 × 12 = $204/year
These calculations assume the same reduction occurs every month.
Actual heating and cooling improvements are often seasonal, so annual results may differ substantially.
The assumed 50–100 kWh reduction is an example, not a prediction of what an audit will achieve.
Savings at Different Electricity Rates
| Monthly Reduction | $0.12/kWh | $0.17/kWh | $0.25/kWh |
|---|---|---|---|
| 25 kWh | $3 | $4.25 | $6.25 |
| 50 kWh | $6 | $8.50 | $12.50 |
| 75 kWh | $9 | $12.75 | $18.75 |
| 100 kWh | $12 | $17 | $25 |
| 150 kWh | $18 | $25.50 | $37.50 |
Use your own marginal electricity rate for a more relevant estimate.
If you have time-of-use or tiered pricing, savings depend on when the electricity reduction occurs and which rate applies.
What About Natural Gas Savings?
Suppose air sealing and insulation improvements reduce natural gas consumption by an illustrative 5 therms per month during a five-month heating season.
Assume a variable natural gas cost of $1.50 per therm.
5 therms × $1.50 = $7.50/month
$7.50 × 5 months = $37.50 per heating season
Fixed gas service fees generally remain unchanged.
This example demonstrates the calculation, not a guaranteed reduction.
How to Estimate Payback
Simple payback estimates how long energy savings would take to equal an improvement’s upfront cost.
Simple payback = Project cost ÷ Annual savings
Suppose a weatherstripping project costs $60 and produces an estimated $20 in annual savings.
$60 ÷ $20 = 3 years
That calculation excludes maintenance, future energy-price changes, and the value of improved comfort.
For expensive projects, compare several contractor estimates and request assumptions behind projected energy savings.
When Is a Professional Energy Audit Worth It?
A professional energy assessment can provide more detailed information than a visual DIY inspection.
This can be particularly valuable before major insulation, HVAC, or building-envelope work.
What Is a Blower Door Test?
A blower door test measures building air leakage.
A technician temporarily installs a calibrated fan in an exterior doorway.
The fan creates a controlled pressure difference between the home and outdoors.
Specialized instruments measure airflow through the fan while the pressure difference is maintained.
This allows the auditor to estimate overall building airtightness.
Results are often reported as air changes per hour at 50 pascals, abbreviated ACH50.
A pascal is a unit of pressure.
ACH50 indicates how many times the home’s indoor air volume would theoretically be replaced in one hour under the specified test pressure.
It is a standardized diagnostic measurement, not the home’s normal natural ventilation rate.
Blower Door Test Cost
A standalone blower door test may cost roughly $150–$400 or more, depending on location and service scope.
A comprehensive professional energy assessment may cost approximately $200–$600 or more.
These are broad budgeting estimates rather than nationally standardized prices.
Some utility programs subsidize testing.
Ask whether the quoted service includes:
- Blower door testing
- Infrared imaging
- Combustion-safety evaluation where appropriate
- Duct leakage assessment
- Written recommendations
- Estimated improvement costs
- Follow-up testing
Why Infrared Imaging Can Help
Thermal imaging shows surface temperature differences.
When conditions are suitable, a trained auditor may identify patterns consistent with air leakage or insulation defects.
However, thermal imaging doesn’t directly measure insulation R-value or prove a particular cause.
Interpretation requires building knowledge and appropriate test conditions.
How to Find a Utility Energy Audit Program
Many electric and gas utilities offer residential efficiency programs.
Availability varies widely.
Some programs include online assessments, discounted professional audits, or home efficiency incentives.
To investigate:
- Visit your utility’s official website.
- Look for “Home Energy Assessment” or “Energy Efficiency Programs.”
- Review eligibility requirements.
- Check whether renters can participate.
- Ask which diagnostic tests are included.
- Confirm whether any contractor restrictions apply.
- Request written pricing before scheduling.
You can also check ENERGY STAR’s Rebate Finder and DSIRE.
Programs vary by state and change often; check current eligibility.
Federal residential energy tax credits under Sections 25C and 25D ended for qualifying expenditures after December 31, 2025. Do not assume a current federal tax credit applies to a new audit or improvement project.
Regional and Climate Considerations
Energy audit priorities depend partly on where you live.
A strategy that works well in Minnesota may be less important in Florida or Arizona.
Hot-Humid South
In hot, humid regions, cooling and moisture control are major considerations.
Look for air leakage around exterior openings and evidence of unwanted moisture entering the building.
Poor humidity control can cause discomfort even when indoor temperatures seem reasonable.
Avoid aggressive air sealing without considering ventilation and moisture management.
A qualified HVAC professional can evaluate equipment sizing, airflow, and dehumidification performance.
Cold Northern States
In colder climates, heat loss through attics, walls, and air leaks can contribute to winter heating costs.
Attic insulation and air sealing may deserve particular attention.
However, homes with fuel-burning heating systems need appropriate combustion air and exhaust venting.
Major tightening projects should account for those requirements.
Dry Western Regions
In hot, dry climates, solar heat gain can increase cooling demand.
Window shading, roof conditions, attic insulation, and cooling equipment performance may be important.
Some homes use evaporative cooling systems.
These systems rely on water evaporation and work best under suitable dry-air conditions.
Their maintenance and water-use requirements differ from conventional air conditioning.
Mixed-Climate Regions
Homes in areas with both hot summers and cold winters need balanced improvements.
Air sealing, insulation, HVAC efficiency, and appropriate ventilation can all matter.
Prioritize measures that address year-round problems rather than focusing exclusively on one season.
Energy Audit Tips for Renters
Renters can benefit from an energy assessment even when major building improvements require landlord approval.
Start with observations that don’t involve permanent modifications.
Renter-Friendly Checks
You can usually:
- Review electricity bills
- Photograph visible drafts or moisture
- Check accessible weatherstripping
- Use compatible LED bulbs
- Adjust normal thermostat schedules
- Check appliance electricity consumption
- Keep HVAC vents unobstructed
- Report maintenance problems
Do not alter shared building systems or utility equipment.
Document Problems Clearly
If a window doesn’t close properly or an HVAC system struggles to maintain comfortable temperatures, document the issue.
Include:
- Location
- Date
- Photos
- Temperature observations
- Relevant utility usage changes
Submit maintenance requests through your landlord’s established process.
Ask Before Installing Products
Removable window films, weatherstripping, and other temporary products may be useful.
However, some products can damage finishes, affect window operation, or conflict with lease terms.
Get approval when required.
Never block emergency exits, ventilation openings, or combustion-air pathways.
Check for Rental Energy Programs
Some utilities offer efficiency assessments for tenants.
Others require property-owner authorization.
Ask whether the program includes renter-appropriate recommendations or direct-install measures.
If your electricity is billed through a landlord rather than directly by a utility, request an explanation of the billing method before assuming your individual consumption is separately measured.
When to Call a Professional
A DIY energy audit should focus on observation and simple, safe improvements.
Some findings require specialized equipment or licensed work.
Call a Licensed Electrician If You Notice:
- Repeatedly tripping breakers
- Hot outlets or switches
- Burning smells
- Sparking
- Persistent unexplained flickering
- Damaged electrical equipment
Do not remove electrical panel covers, alter wiring, or attempt electrical repairs.
If there is smoke, active sparking, or an electrical fire, move away from the hazard and contact emergency services.
Call a Qualified HVAC Technician If:
- Your system cannot maintain normal indoor temperatures.
- Airflow is unusually weak.
- Equipment makes unfamiliar noises.
- Heating or cooling electricity use rises sharply.
- You suspect duct leakage or equipment malfunction.
- A heat pump frequently uses supplemental electric resistance heat unexpectedly.
Refrigerant handling and HVAC electrical repairs are not DIY energy audit tasks.
Call an Insulation or Building-Performance Professional If:
- Attic access is unsafe.
- Insulation appears wet or contaminated.
- You suspect hidden air leakage.
- You’re planning substantial air sealing.
- Moisture damage affects walls or ceilings.
- Existing insulation may contain hazardous material.
Do not disturb suspected asbestos-containing insulation or other unknown materials.
Carbon Monoxide and Combustion Safety
Homes with fuel-burning appliances require appropriate carbon monoxide protection.
Carbon monoxide is an odorless, colorless gas that can be deadly.
Maintain carbon monoxide alarms according to applicable requirements and manufacturer instructions.
If an alarm sounds, follow its emergency instructions and contact emergency services or the appropriate emergency responder.
Do not attempt to diagnose combustion or venting problems yourself.
Portable electric space heaters also require safe operation. Keep them away from combustible materials, follow manufacturer clearance instructions, and avoid extension cords or power strips.
Common Mistakes to Avoid
1. Buying Equipment Before Identifying the Problem
A thermal camera or expensive monitor isn’t necessary for every home.
Start with utility bills and visual observations.
Purchase additional tools only when they will answer a specific question.
2. Assuming Every Cold Spot Means Missing Insulation
Surface temperatures can differ because of framing, airflow, sunlight, or moisture.
Use observations as clues rather than definitive diagnoses.
3. Sealing Every Opening You Find
Some openings provide necessary ventilation, drainage, or combustion air.
Never seal an opening unless you understand its purpose.
4. Ignoring Moisture Before Adding Insulation
Wet insulation can lose effectiveness and contribute to building damage.
Resolve leaks and moisture problems before covering affected areas.
5. Comparing Bills Without Accounting for Weather
A lower electric bill after an improvement doesn’t automatically prove the improvement caused the reduction.
Weather, occupancy, rates, and billing periods also matter.
6. Replacing Windows Before Checking Simpler Problems
Window replacement can be expensive.
Damaged weatherstripping or minor accessible gaps may have more affordable solutions.
7. Assuming an Audit Guarantees Savings
An assessment identifies opportunities.
Savings depend on what improvements are completed, their quality, and the home’s operating conditions.
8. Skipping Professional Evaluation Before Major Upgrades
Significant insulation, HVAC, or air sealing projects can affect other building systems.
A qualified assessment may help prevent expensive mistakes.
FAQ
1. Can I do a home energy audit myself?
Yes. Homeowners and renters can perform a basic energy assessment by reviewing utility bills, checking accessible air leaks, observing insulation conditions, inspecting HVAC filters, and evaluating appliance use. A DIY assessment can identify practical improvements, but it cannot replace professional diagnostic testing for hidden leakage, combustion safety, or complex building problems.
2. How much does a DIY home energy audit cost?
A basic assessment may cost nothing if you already have a flashlight, utility bills, and a phone for recording observations. Optional supplies and simple tools may bring the cost to approximately $25–$75. Specialized devices such as thermal cameras cost more and aren’t necessary for most initial inspections.
3. How long does a home energy audit take?
A basic homeowner walkthrough may take one to three hours, depending on property size and accessibility. Reviewing a full year of utility bills and documenting problems may take additional time. Professional audits often take several hours, particularly when blower door testing, infrared imaging, or detailed equipment assessments are included.
4. What is the best time of year to do a home energy audit?
You can review bills and inspect appliances at any time. Drafts and insulation-related temperature differences may be easier to notice when indoor and outdoor temperatures differ significantly. Some professional diagnostic tests also benefit from suitable temperature conditions. Avoid inspecting unsafe attics or other hazardous spaces during extreme weather.
5. How do I find energy leaks in my house?
Start by inspecting accessible windows, exterior doors, attic hatches, and penetrations through exterior walls. Look for visible gaps, damaged weatherstripping, and noticeable drafts. A windy day may make leakage easier to detect. Professional blower door testing provides a more systematic assessment of overall air leakage and can help locate less obvious problems.
6. Is a blower door test worth the money?
It can be worthwhile when you suspect substantial air leakage, have persistent comfort problems, or plan significant insulation and air sealing improvements. The test measures building airtightness under controlled conditions. Whether the expense makes sense depends on your home’s condition, the test price, and whether the results will guide specific improvements.
7. How much does a professional home energy audit cost?
A professional residential assessment may cost roughly $200–$600 or more, depending on location, home size, and included testing. A standalone blower door test may cost approximately $150–$400 or more. Some utilities offer discounted programs. Request a written description of the services included before comparing prices.
8. Will a home energy audit lower my electric bill?
The audit itself usually doesn’t reduce energy consumption. It helps identify changes that may do so. Savings depend on the problems found, improvements completed, equipment operation, weather, and electricity rates. Low-cost maintenance and air sealing may be worthwhile in some homes, while others require more substantial work.
9. Do utility companies offer free home energy audits?
Some utilities offer no-cost online assessments, basic walkthroughs, or subsidized professional audits. Others charge fees or limit programs to certain customers. The level of service can vary considerably. Check your utility’s official website and confirm whether diagnostic testing is included before scheduling an appointment.
10. Can renters get a home energy audit?
Yes, renters can perform basic assessments and may be eligible for certain utility-sponsored programs. However, permanent improvements, specialized testing, and access to shared building systems may require landlord approval. Start with utility consumption, accessible drafts, thermostat settings, lighting, and appliance use. Report building maintenance issues through the appropriate property-management process.
11. Should I get an energy audit before replacing my HVAC system?
A professional energy assessment can be useful before a major HVAC replacement, particularly if your home has comfort problems, air leakage, or inadequate insulation. Addressing building-envelope issues may affect heating and cooling requirements. A qualified HVAC contractor should also perform an appropriate load calculation rather than selecting replacement equipment solely by matching the old unit’s capacity.
12. Are home energy audits worth it for newer homes?
They can be. Newer homes may have better insulation and equipment than older properties, but construction quality, installation details, ventilation, and occupant behavior still matter. A basic DIY assessment can identify obvious maintenance issues. A comprehensive professional audit may be more useful when unexplained energy consumption or persistent comfort problems exist.
Start with the Simple Checks
A DIY home energy audit gives you a clearer picture of how your home uses energy before you commit to expensive improvements.
Start with utility bills, inspect accessible areas for drafts and insulation problems, and review your heating, cooling, lighting, and appliance use.
Then prioritize findings based on safety, likely energy impact, and repair cost.
Your Final Energy Audit Checklist
- Gather 12 months of electricity and heating bills.
- Calculate average daily energy consumption.
- Inspect accessible windows and exterior doors for drafts.
- Check visible attic insulation only where access is safe.
- Review HVAC filters, vents, and thermostat settings.
- Identify frequently used or high-consumption appliances.
- Check accessible plumbing for hot-water leaks.
- Document moisture or ventilation concerns.
- Estimate improvement costs and possible savings.
- Contact professionals for unsafe or complex problems.
- Check utility programs before scheduling a paid assessment.
- Track energy consumption after making improvements.
You may discover that a few inexpensive changes address your most noticeable problems.
Or your findings may show that professional blower door testing, insulation work, or HVAC evaluation would be a better next step.
Either outcome is useful because it helps you spend money on improvements that address actual conditions in your home.