A drafty home can feel uncomfortable even when your heating or air conditioning is running normally. Cold air may enter around windows and doors, while heated or cooled indoor air escapes through gaps you cannot easily see.
Learning how to find air leaks in house is one of the most practical ways to improve comfort without immediately replacing windows, upgrading insulation, or buying new HVAC equipment.
Read Also: Space Heater Cost to Run: Real Calculations + Safer, Cheaper Alternatives
Many common leaks can be addressed with inexpensive materials such as weatherstripping, caulk, and door sweeps. Others, particularly leaks in attics, crawl spaces, and HVAC ductwork, may require professional help.
This guide explains how to locate hidden drafts, choose appropriate sealing materials, estimate air sealing costs, and avoid mistakes that could create ventilation or moisture problems.
You’ll also learn which projects make sense for renters, when professional air sealing is worth considering, and how to estimate potential energy savings using your utility bills.
Quick Takeaways
- Air leaks commonly occur around doors, windows, attic openings, plumbing penetrations, and ductwork.
- A visual inspection and careful draft testing can help identify many accessible leaks.
- Weatherstripping works best on moving surfaces, while caulk seals stationary gaps.
- Basic DIY air sealing materials may cost approximately $25–$150, depending on the number of leaks.
- Professional air sealing often costs several hundred to a few thousand dollars, depending on the home’s size and condition.
- According to ENERGY STAR, sealing air leaks and adding insulation can save an average of approximately 15% on heating and cooling costs in suitable homes.
- Air sealing should not block required ventilation, combustion air, or moisture-control systems.
- Start with obvious leaks, then consider professional testing if drafts or unusually high energy use continue.
What Is Air Sealing and Why Does It Matter?
Air sealing means closing unintended openings in your home’s exterior enclosure, sometimes called the building envelope.
The building envelope includes the walls, roof, foundation, windows, and doors that separate indoor living spaces from outdoor conditions.
Read Also: Ductless Mini-Split Guide: Costs, Pros, Cons, and Energy Savings
Even a well-insulated house can waste energy when outside air moves through gaps in that enclosure.
How Air Leaks Affect Heating and Cooling
Air naturally moves between areas with different temperatures and air pressures.
During winter, warm indoor air can escape through openings near the roof. As that air leaves, colder outdoor air may enter through gaps near the foundation, windows, and doors.
This movement is partly caused by the stack effect, which describes how differences in indoor and outdoor air temperature create pressure differences throughout a building.
Wind and exhaust fans can also push or pull air through openings.
During summer, unwanted air infiltration can introduce heat and humidity, increasing the workload on your air conditioner.
This matters because your HVAC system must replace some of the heating or cooling lost through uncontrolled airflow.
Air Sealing vs. Insulation: What’s the Difference?
Air sealing and insulation perform different jobs.
Air sealing reduces unwanted airflow. Insulation slows heat transfer through building materials.
For example, insulation in an attic can slow heat movement between the living space and the attic. However, gaps around plumbing pipes or ceiling openings may still allow conditioned indoor air to escape.
Insulation effectiveness is commonly measured using R-value. A higher R-value indicates greater resistance to heat flow.
Adding insulation without addressing major air leaks may leave comfort problems unresolved.
The US Department of Energy recommends considering air sealing and insulation together as part of a whole-home efficiency strategy.
For a deeper explanation of insulation performance, see our Home Insulation Guide.
How Much Energy Can Air Sealing Save?
ENERGY STAR estimates that homeowners can save an average of approximately 15% on heating and cooling costs by air sealing their homes and adding insulation in areas such as attics, floors over crawl spaces, and accessible basement rim joists.
That estimate represents combined improvements, not a guaranteed result from caulking or weatherstripping alone.
Actual savings depend on existing leakage, insulation levels, local climate, energy prices, and household behavior.
How to Find Air Leaks in Your House
Finding air leaks is often easier when there is a noticeable temperature difference between indoors and outdoors.
A cold winter day or hot summer afternoon can make drafts easier to detect.
However, some leaks remain hidden inside wall cavities, attic floors, and mechanical spaces.
Step 1: Start With a Visual Inspection
Walk through your home and inspect areas where different building materials meet.
Look for daylight around doors, cracked caulk, damaged weatherstripping, and visible openings around pipes.
Read Also: Heat Pump Cost Guide: Installation Prices, Running Costs, and Payback
Pay particular attention to exterior walls and rooms that feel noticeably hotter or colder than others.
Use a flashlight to inspect accessible gaps.
Do not remove electrical covers or open electrical equipment to search for leaks.
Step 2: Feel for Drafts
On a windy day, slowly move your hand around closed windows and exterior doors.
Check the edges of the frames, bottom of the doors, and areas where trim meets the wall.
A noticeable stream of outside air may indicate leakage.
Remember that cold glass can create downward air movement indoors even when a window is properly sealed.
This means a cold sensation near a window does not always prove outside air is entering.
Step 3: Use a Tissue Test
Hold a lightweight tissue near a suspected gap.
Watch for movement that suggests air is entering or leaving.
This simple test can help identify drafts around:
- Exterior door frames
- Window trim
- Baseboards
- Attic access hatches
- Accessible plumbing penetrations
Turn off nearby fans that could distort the results.
Avoid using candles, incense, or open flames to locate leaks. They introduce unnecessary fire and indoor air quality risks.
Step 4: Check Windows and Doors With a Flashlight
At night, ask another household member to shine a flashlight around the exterior edges of a closed door.
Look from inside for visible light passing through gaps.
This method is particularly useful around poorly fitted exterior doors.
Read Also: Heat Pump vs Furnace: Costs, Efficiency, and Which Is Right for Your Home
It will not identify every leak, but visible daylight or flashlight beams passing through the closed door perimeter indicate openings worth investigating.
Step 5: Consider a Professional Blower Door Test
A blower door is a large calibrated fan installed temporarily in an exterior doorway.
It changes indoor air pressure so a trained technician can measure how much air leaks through the building enclosure.
Results are commonly reported as ACH50, meaning air changes per hour at a test pressure of 50 pascals.
A lower ACH50 generally indicates a tighter building.
Technicians may use infrared cameras, pressure measurements, and other diagnostic tools to help locate leakage pathways.
A blower door test can be particularly valuable when drafts continue despite basic repairs.
The next step is identifying which openings deserve attention first.
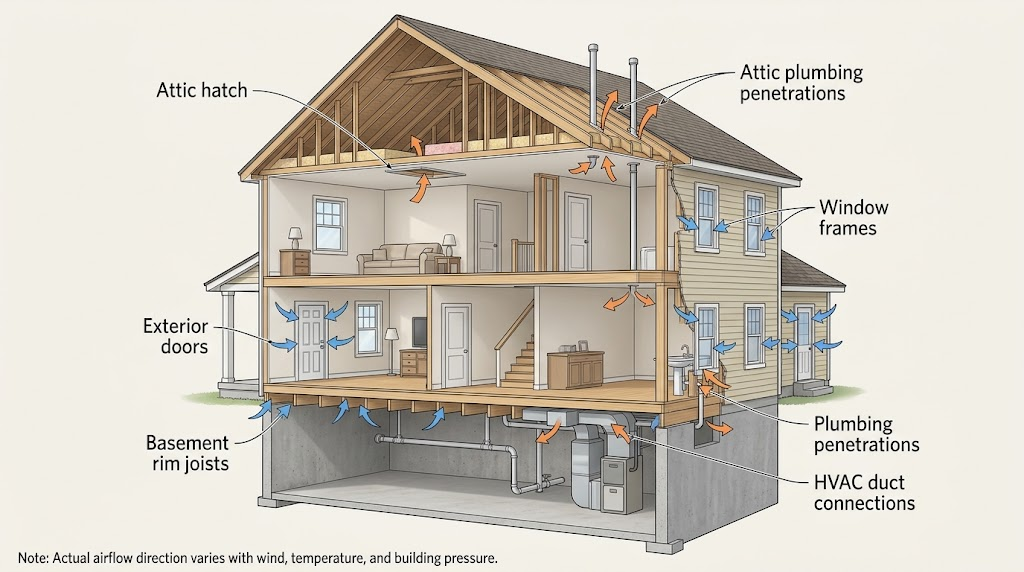
The Most Common Places Air Leaks Hide
Some of the largest air leaks are not located around windows.
Attics, basements, and openings for plumbing or mechanical equipment can contribute significantly to uncontrolled airflow.
The following checklist helps prioritize an inspection.
Home Air Leak Inspection Checklist
| Location | What to Look For | Typical Solution | DIY Difficulty |
|---|---|---|---|
| Exterior doors | Light or drafts around edges | Weatherstripping | Easy |
| Door bottoms | Gap between door and threshold | Door sweep | Easy |
| Window frames | Cracked or missing caulk | Exterior-rated caulk | Easy–Moderate |
| Window sashes | Loose or damaged seals | Replacement weatherstripping | Easy–Moderate |
| Baseboards | Gaps against exterior walls | Appropriate sealant | Easy |
| Attic hatch | Unsealed perimeter | Gasket or weatherstripping | Moderate |
| Plumbing penetrations | Gaps around pipes | Compatible sealant | Moderate |
| Basement rim joists | Openings where framing meets foundation | Approved air-sealing system | Professional preferred |
| Recessed lights | Leakage around ceiling fixtures | Approved air-sealing treatment | Professional preferred |
| HVAC ducts | Leaking joints in accessible ductwork | Approved duct mastic | Moderate–Professional |
| Fireplace | Drafts through damper or surrounding structure | Inspection and approved repairs | Professional |
Why Attic Leaks Can Be Especially Important
Warm air rises, making openings near the top of a house important during cold weather.
Common attic leakage locations include plumbing stacks, wiring penetrations, attic access doors, and gaps around framing.
However, attic work introduces additional hazards.
Loose insulation can hide ceiling openings, wiring, and framing gaps. Some older insulation and building materials may also require special handling.
Never step between attic joists or disturb suspected asbestos-containing materials.
If you are unsure about safe access, hire an insulation or home-performance contractor.
Don’t Ignore Duct Leaks
Leaky HVAC ducts can waste conditioned air, particularly when ductwork passes through unconditioned attics, garages, or crawl spaces.
According to ENERGY STAR, duct systems in typical houses can lose approximately 20%–30% of the air moving through them because of leaks, holes, and poorly connected ducts.
This does not mean every home loses that amount or that sealing ducts will produce equivalent bill savings.
Duct sealing and building-envelope air sealing are related but separate improvements.
For more information, see our HVAC Duct Sealing and Insulation Guide.
How to Seal Air Leaks: Step-by-Step DIY Guide
Once you locate an opening, choose a sealing method based on its size, location, and whether the surrounding materials move.
For most homeowners, doors and accessible window gaps are reasonable starting points.
Step 1: Clean the Surface
Remove loose dirt, dust, and failing sealant.
Most caulks and adhesive weatherstripping products need clean, dry surfaces to bond properly.
Follow the manufacturer’s instructions for surface preparation and temperature requirements.
Step 2: Select the Right Material
Use caulk for stationary joints and weatherstripping for moving surfaces.
For larger openings, a compatible backer rod or manufacturer-approved foam product may be appropriate.
A backer rod is a flexible foam cord placed inside a wide joint before caulking.
It helps control sealant depth and reduces the amount of caulk needed.
Do not use ordinary expanding foam around heat-producing equipment, flues, chimneys, or other locations requiring special fire-rated materials.
Step 3: Seal Stationary Gaps With Caulk
Apply an appropriate caulk to small, accessible joints around stationary window trim, exterior door trim, and similar areas.
Choose an exterior-rated product for outdoor applications.
Check whether the product is paintable and compatible with wood, vinyl, aluminum, masonry, or other surrounding materials.
Apply a continuous bead according to the manufacturer’s instructions.
Smooth the bead if required and allow sufficient curing time.
Do not seal window drainage openings, also called weep holes. These openings allow collected water to drain.
Step 4: Install Weatherstripping
Measure the door or window opening before purchasing replacement weatherstripping.
Cut the material to fit and attach it according to the product instructions.
Close the door or window afterward.
The seal should make consistent contact without preventing normal operation.
Step 5: Add a Door Sweep
A door sweep seals the gap beneath an exterior door.
Common options include adhesive sweeps, screw-mounted sweeps, and automatic door bottoms.
Choose a product compatible with the door material and threshold.
The sweep should reduce drafts without dragging excessively or creating a tripping hazard.
Step 6: Recheck for Drafts
After the materials cure or settle, repeat your inspection.
Check that doors latch properly, windows operate normally, and drainage paths remain open.
If you still notice significant drafts, another leakage pathway may be responsible.
Avoid sealing every opening without understanding its purpose.
Some openings provide required ventilation or support safe operation of combustion appliances.
Weatherstripping Doors and Windows
Weatherstripping is one of the most accessible drafty house fixes.
Unlike caulk, weatherstripping is designed for places where two surfaces move against each other.
The best type depends on the size and shape of the gap.
Common Weatherstripping Materials Compared
| Material | Best Use | Advantages | Limitations |
|---|---|---|---|
| Adhesive foam tape | Small, consistent gaps | Inexpensive and easy to install | May compress or deteriorate |
| V-strip | Window sashes and door edges | Flexible, relatively discreet | Requires careful alignment |
| Rubber or silicone gasket | Exterior door frames | Durable sealing when properly fitted | May cost more |
| Felt | Low-use doors or windows | Low initial cost | Less durable and moisture-resistant |
| Door sweep | Bottom of exterior doors | Addresses a common draft location | Must match threshold clearance |
| Tubular gasket | Larger, regular gaps | Compressible seal | Can interfere with closing if oversized |
How to Choose the Right Weatherstripping
Start by measuring the gap.
Weatherstripping that is too thin may not seal properly.
Material that is too thick can prevent doors from closing or windows from locking.
For frequently used exterior doors, durable rubber or silicone gaskets are often worth considering.
For a temporary or low-cost repair, adhesive foam tape may be sufficient.
When Weatherstripping Won’t Solve the Problem
Sometimes the problem is not the seal.
A warped door, damaged frame, poorly installed window, or deteriorated threshold may continue leaking after new weatherstripping is installed.
In those cases, adjusting or repairing the existing assembly may be more effective.
Full window replacement is generally not necessary solely because minor perimeter air leaks are present.
Before purchasing replacement windows, consider whether targeted repairs could address the problem at substantially lower cost.
Realistic Costs & Savings
Air sealing cost depends on how many leaks exist, where they are located, and whether professional diagnostics or repairs are necessary.
Small DIY projects can be inexpensive.
Whole-home improvements involving attic bypasses, rim joists, ductwork, and insulation may cost considerably more.
Typical Air Sealing Costs in the US
The following figures are approximate planning ranges, not national averages or contractor quotes.
Actual prices vary by market, materials, accessibility, and project scope.
| Project | Approximate Cost | Notes |
|---|---|---|
| Caulk and basic supplies | $10–$40 | Small window or trim project |
| Adhesive weatherstripping | $5–$25 | Per package or small project |
| Door sweep | $10–$50 | Per door, materials only |
| DIY door and window sealing | $25–$150 | Several minor leaks |
| Professional blower door test | $200–$500 | May be included in an energy audit |
| Professional air sealing | $500–$2,500+ | Scope and access strongly affect price |
| Combined air sealing and insulation | $1,500–$5,000+ | Larger projects may cost more |
These are illustrative budgeting estimates rather than fixed market prices.
Get written estimates that distinguish air sealing from insulation, ventilation improvements, and other work.
Worked Example: How Much Could Air Sealing Save?
Consider a hypothetical 2,000 sq ft house in a mixed climate.
Assume the following:
- Electricity costs $0.17 per kilowatt-hour (kWh).
- Annual electricity consumption is 12,000 kWh.
- Heating and cooling account for 45% of electricity use.
- Air sealing reduces heating and cooling energy use by an assumed 5%–15%.
A kilowatt-hour is the amount of electricity used by a 1,000-watt appliance operating for one hour.
The 5%–15% improvement range is a scenario assumption for this calculation, not a guaranteed outcome or a prediction for every home.
Step 1: Calculate annual electricity spending.
Formula:
Annual electricity cost = Annual kWh × Electricity rate
12,000 kWh × $0.17 = $2,040 per year
Step 2: Estimate annual heating and cooling costs.
Formula:
Heating and cooling cost = Annual electricity cost × HVAC share
$2,040 × 45% = $918 per year
Step 3: Estimate possible annual savings.
Formula:
Annual savings = Heating and cooling cost × Assumed reduction
At 5%:
$918 × 0.05 = $45.90 per year
At 15%:
$918 × 0.15 = $137.70 per year
Under these assumptions, annual electricity savings would be approximately $46–$138.
Actual results could be lower or higher.
Example Payback Calculation
Suppose DIY materials cost $100.
Using the example above:
Payback period = Project cost ÷ Annual savings
At $46 annual savings:
$100 ÷ $46 = approximately 2.2 years
At $138 annual savings:
$100 ÷ $138 = approximately 0.7 years
This simplified calculation excludes labor, material replacement, financing, and changes in energy prices.
It also assumes the estimated reduction actually occurs.
A professional $1,500 project would take longer to recover its cost through energy savings alone under these assumptions.
However, comfort improvements and moisture control may also influence a homeowner’s decision.
What If Your Home Uses Natural Gas?
If your furnace burns natural gas, calculate heating savings separately.
Gas use is commonly billed in therms.
One therm represents approximately 100,000 British thermal units (Btu) of energy.
For example, suppose your household uses 500 therms annually for space heating at an assumed variable gas cost of $1.50 per therm.
Annual heating fuel cost:
500 × $1.50 = $750
At an assumed 5%–15% reduction:
$750 × 0.05 = $37.50
$750 × 0.15 = $112.50
Estimated annual savings would be approximately $38–$113 under these assumptions.
Do not apply the same percentage to your entire utility bill unless the entire bill represents the energy use affected by the project.
Fixed customer charges generally do not decrease when consumption falls.
How to Calculate Savings Using Your Own Utility Bill
Find your electricity rate in dollars per kWh.
For a basic estimate, divide your electricity supply and variable delivery charges by total kWh used. Exclude fixed fees where possible.
Then estimate your heating and cooling consumption using utility data, smart thermostat reports, or a home energy audit.
If your utility provides monthly usage history, compare mild-weather months with peak summer and winter periods.
This can help estimate seasonal HVAC consumption, although other seasonal loads may affect the comparison.
For a more accurate assessment, consider a professional home energy evaluation.
Are There Rebates for Air Sealing?
Some utilities, states, and local programs offer incentives for insulation, air sealing, home energy audits, or broader weatherization projects.
Programs vary by state and change often; check current eligibility.
Useful resources include:
- ENERGY STAR Rebate Finder
- Database of State Incentives for Renewables & Efficiency
- Your state energy office
- Your electric or gas utility
Federal residential energy tax credits under Sections 25C and 25D ended for expenditures after December 31, 2025.
Do not assume older federal tax-credit information remains applicable to new projects.
Air Sealing Tips for Different US Climates
Air sealing can improve comfort across the country, but climate affects where leaks matter most and how moisture should be managed.
Cold Northern States
In places such as Minnesota, Wisconsin, Michigan, and northern New England, winter heat loss and stack-effect airflow are major considerations.
Warm, humid indoor air can enter cold attic assemblies through ceiling leaks.
If that moisture condenses, it may contribute to frost, damp insulation, or wood deterioration.
Sealing attic-floor leakage pathways can be important, but ventilation and moisture problems should be evaluated together.
Ice dams may involve a combination of heat leakage, insulation deficiencies, roof conditions, and weather.
Hot-Humid Southern States
In Florida, Louisiana, coastal Texas, and other humid regions, outside air infiltration adds both heat and moisture.
Your air conditioner must remove moisture as well as lower indoor temperature.
This can increase cooling demand.
However, excessive indoor humidity may also result from oversized air conditioning equipment, poor ventilation, water intrusion, or incorrect HVAC operation.
Air sealing alone will not correct every humidity problem.
Keep bathroom and kitchen exhaust systems operating properly.
Hot, Dry Western States
In Arizona, Nevada, and inland California, uncontrolled airflow can introduce substantial heat during hot weather.
Sealing openings around doors, windows, and attic penetrations may improve cooling efficiency.
However, solar heat gain through windows is a separate issue.
Window coverings, exterior shading, and appropriate window performance can help manage sunlight-related heat gain.
Air sealing does not replace those strategies.
Mixed Climates
States such as Virginia, Tennessee, Missouri, and parts of Pennsylvania experience meaningful heating and cooling seasons.
Year-round air sealing may reduce both winter drafts and summer infiltration.
Because weather conditions vary, homeowners should consider heating, cooling, humidity, and ventilation together rather than focusing on only one season.
Renter-Friendly Ways to Stop Drafts
Renters can address some comfort problems without making permanent changes.
The best options are inexpensive, removable, and permitted under the lease.
Temporary Weatherstripping
Removable adhesive foam tape can help reduce small gaps around certain doors and windows.
Choose products labeled for the surface and test a small hidden area first.
Adhesives can damage paint or finishes during removal.
Avoid installing anything that prevents windows from opening or doors from closing properly.
Removable Window Insulation Film
Interior window film kits use clear plastic sheets to create an additional air space over a window.
When installed correctly, they can reduce drafts associated with the window assembly and some heat transfer.
They are typically intended for seasonal use.
Do not cover required emergency escape openings or interfere with window operation where access must be maintained.
Draft Stoppers
Fabric draft stoppers can reduce the sensation of cold air near the bottom of a door.
They are inexpensive and easy to remove.
However, they may not create a continuous seal, and loose products can become trip hazards.
A properly fitted door sweep is usually a more durable option when installation is allowed.
Ask Your Landlord About Permanent Repairs
Report damaged window seals, large door gaps, water intrusion, and ventilation problems to the property owner or manager.
Include photographs and a description of when the problem occurs.
Avoid permanent caulking, drilling, or structural modifications without permission.
Also avoid sealing doors or vents associated with fuel-burning equipment, shared building ventilation, or required airflow.
For renters, the most effective approach is often a combination of small reversible improvements and documented maintenance requests.
When to Call a Professional
Not every air leak is suitable for DIY repair.
Some locations require specialized equipment, knowledge of building materials, or an understanding of ventilation and combustion safety.
Signs You May Need Professional Air Sealing
Consider an energy auditor or qualified home-performance contractor when:
- Your home remains drafty after basic weatherstripping and caulking.
- Rooms have persistent temperature differences.
- Attic insulation appears dirty or stained from airflow.
- You suspect major leaks in an attic or crawl space.
- HVAC ducts run through inaccessible or unconditioned spaces.
- You notice recurring condensation, moisture damage, or mold.
- Your heating and cooling costs remain unusually high despite normal equipment operation.
A professional can help distinguish air leakage from insulation deficiencies, duct problems, and HVAC sizing or maintenance issues.
Combustion Safety: An Important Warning
Homes with natural gas, propane, oil, or wood-burning appliances need particular care.
Air sealing can change pressure relationships and airflow inside a building.
In certain conditions, exhaust gases from combustion appliances may enter occupied spaces instead of leaving through their intended venting systems.
This is called backdrafting.
Carbon monoxide is an odorless, potentially deadly gas produced by incomplete combustion.
Maintain working carbon monoxide alarms according to applicable codes and manufacturer instructions.
Do not seal combustion-air openings or modify flues, chimneys, gas lines, or appliance venting.
If you suspect a combustion appliance is malfunctioning, stop using it and contact an appropriate qualified professional.
For gas appliance or HVAC safety concerns, hire a licensed HVAC technician or other appropriately licensed contractor.
For electrical issues, hire a licensed electrician.
If a carbon monoxide alarm sounds, follow its emergency instructions and leave the building.
Be Careful Around Attics and Recessed Lights
Attics may contain exposed wiring, concealed openings, and insulation that should not be disturbed.
Older recessed light fixtures may have clearance requirements that prohibit contact with insulation or certain sealing materials.
Never apply ordinary spray foam or caulk around hot fixtures or exhaust flues without confirming that the material and installation are approved for that use.
A professional can select suitable fire-rated or temperature-rated products where required.
Why Ventilation Still Matters
A tighter home can be more energy efficient, but occupants still need adequate fresh air.
Ventilation helps control indoor pollutants and moisture.
If significant air sealing is planned, a home-performance contractor may recommend evaluating mechanical ventilation.
Mechanical ventilation uses fans or dedicated equipment to exchange indoor and outdoor air in a controlled way.
Some homes benefit from an energy recovery ventilator (ERV) or heat recovery ventilator (HRV).
These systems transfer some heat between incoming and outgoing air streams, helping reduce the energy penalty associated with ventilation.
An ERV can also transfer some moisture, depending on its design.
Not every home needs one, and equipment selection depends on climate, building characteristics, and ventilation requirements.
Common Mistakes to Avoid
Air sealing works best when the repair matches the problem.
Avoid these common mistakes.
1. Sealing Window Drainage Holes
Window weep holes allow trapped water to escape.
Blocking them can contribute to water accumulation and damage.
Check the window manufacturer’s documentation before applying sealant.
2. Using Caulk on Moving Parts
Caulk is not a substitute for weatherstripping.
Applying it between a window sash and frame may prevent the window from opening.
Use flexible weatherstripping where movement is required.
3. Choosing Weatherstripping That’s Too Thick
Oversized weatherstripping can prevent doors from latching and windows from locking.
Measure the gap and test operation after installation.
4. Ignoring Attic Leakage
Sealing only visible window gaps may leave larger leakage pathways untouched.
Attic penetrations and access hatches can be important sources of airflow.
Have hazardous or difficult-to-access areas evaluated professionally.
5. Blocking Required Ventilation
Do not cover bathroom exhaust outlets, appliance combustion-air openings, or other required ventilation pathways.
A tighter building must still provide adequate ventilation.
6. Using Ordinary Foam Near Heat Sources
Some foam products are combustible or unsuitable for elevated temperatures.
Follow product instructions and applicable building requirements.
Use a qualified contractor for sealing near chimneys, flues, and heat-producing fixtures.
7. Expecting Air Sealing to Fix Every Comfort Problem
Drafts can result from air leakage, but discomfort may also involve inadequate insulation, poor duct design, solar heat gain, or HVAC problems.
For example, an air conditioner that runs constantly might be responding to high cooling loads, restricted airflow, equipment problems, or incorrect sizing.
Air sealing can help reduce the load but cannot repair a malfunctioning system.
If equipment performance is questionable, schedule an HVAC inspection before considering replacement.
FAQ
How do I find air leaks in my house without special equipment?
Start by inspecting closed doors, windows, baseboards, and accessible openings around pipes. Look for daylight, damaged weatherstripping, and missing caulk. On a windy day, use your hand or a lightweight tissue to check for noticeable airflow. These methods can identify obvious leaks, but a professional blower door test is more effective for evaluating hidden leakage.
What is the easiest way to fix a drafty house?
Begin with exterior doors and accessible window gaps. Replace damaged weatherstripping, install a properly fitted door sweep, and caulk small stationary openings where appropriate. These repairs are relatively inexpensive and usually require basic tools. If drafts remain, consider checking attic access points and arranging a home energy audit to identify less obvious problems.
How much does it cost to air seal a house?
Small DIY projects may cost around $25–$150 in materials. Professional air sealing can cost approximately $500–$2,500 or more, depending on home size, accessibility, and the amount of work required. These are broad planning ranges rather than guaranteed prices. Get itemized quotes and ask whether testing, insulation, ventilation adjustments, and follow-up verification are included.
Is air sealing worth it in an older house?
Older houses may benefit from air sealing, particularly when doors, windows, and attic penetrations have deteriorated over time. However, some older homes also have moisture, ventilation, or combustion-safety concerns that need evaluation. Start with accessible gaps, and consider a professional energy audit before making extensive changes to the building enclosure.
Can air sealing reduce my electricity bill?
Air sealing may reduce electricity consumption when your home uses electric heating or air conditioning. Savings depend on how much conditioned air currently escapes, the local climate, and the effectiveness of the repairs. ENERGY STAR reports average savings of approximately 15% on heating and cooling costs from combined air sealing and insulation improvements, not from air sealing alone.
Should I caulk or weatherstrip my windows?
Use caulk for stationary joints, such as suitable gaps between window trim and surrounding materials. Use weatherstripping where window components move, including operable sash edges. Avoid blocking drainage holes or making windows difficult to open. If the frame is warped or damaged, repairs may be needed before new sealing materials will work effectively.
Can a house be sealed too tightly?
Yes, inadequate ventilation can become a concern when a home is tightened without considering indoor air quality and combustion safety. Air sealing should reduce unintended leakage while preserving appropriate ventilation. Extensive projects may require a ventilation assessment, particularly in homes with fuel-burning appliances or persistent moisture problems. A qualified home-performance professional can evaluate these conditions.
Will air sealing help my air conditioner run less?
It may. Reducing outdoor air infiltration can lower the amount of heat and humidity your air conditioner must remove. However, frequent operation can also result from hot weather, equipment sizing, thermostat settings, dirty filters, or mechanical problems. If your AC runs continuously and cannot maintain the set temperature, have a qualified HVAC technician inspect the system.
Is a blower door test worth the money?
A blower door test can be useful when your house has persistent drafts, unusually high heating or cooling costs, or planned insulation improvements. It measures overall building leakage and can support targeted diagnostics. For a home with only one obvious door gap, testing may be unnecessary. Ask whether your utility offers discounted energy audits before paying privately.
Can renters seal air leaks without permission?
Renters can often use removable draft stoppers and certain temporary weatherstripping products, subject to lease requirements. Avoid drilling, permanent caulking, or modifying windows and doors without approval. Do not block ventilation or emergency exits. For damaged seals, significant drafts, or water intrusion, notify the landlord and request repairs rather than making potentially unsafe permanent changes.
Should I replace drafty windows or seal them?
Try to determine whether the draft comes from failed weatherstripping, gaps around the frame, damaged components, or the window’s overall construction. Minor leakage may be addressed through sealing or repairs at a much lower cost than replacement. Replacement becomes more reasonable when windows are severely deteriorated, cannot operate safely, or have problems that cannot be economically repaired.
What time of year is best for air sealing?
Air sealing can be performed year-round, but mild, dry weather is often convenient for outdoor caulking and similar projects. Many sealants require specific application temperatures and curing conditions. Winter and summer can make leaks easier to notice because indoor and outdoor temperatures differ. Follow product instructions and address urgent water intrusion or serious drafts promptly rather than waiting for a particular season.
Final Air Sealing Checklist
Air sealing is a practical way to improve indoor comfort and potentially reduce wasted heating and cooling energy.
The most effective approach is to identify leakage pathways, repair accessible openings with suitable materials, and avoid interfering with ventilation or building safety systems.
Before starting your project, use this checklist:
- Inspect exterior doors and windows for visible gaps.
- Check accessible attic hatches, trim, and plumbing penetrations.
- Replace damaged door and window weatherstripping.
- Install a door sweep where appropriate.
- Caulk small stationary gaps using compatible products.
- Keep window drainage openings and required ventilation clear.
- Check utility bills to establish a baseline for energy use.
- Request professional testing if major drafts persist.
- Compare contractor quotes for larger projects.
- Check utility and state rebate programs before scheduling eligible work.
For many households, the best starting point is a modest project involving one or two drafty doors or windows.
Once those openings are addressed, reassess comfort before committing to larger improvements.
If your home still feels drafty, a professional energy audit can help determine whether additional air sealing, insulation, duct repairs, or HVAC improvements offer the greatest practical benefit.
The goal is not to make your home airtight at any cost. It is to reduce unwanted air leakage while maintaining safe ventilation, moisture control, and comfortable indoor conditions.
Pingback: Attic Insulation Cost Guide: R-Values, Types, and DIY vs. Pro – Energy Savings Perlon