Drafty windows can make an otherwise comfortable home feel cold in winter and uncomfortably warm in summer. They can also increase heating and cooling costs, especially when your windows are older, poorly sealed, or exposed to direct sunlight.
Fortunately, learning how to insulate windows doesn’t necessarily mean replacing them or spending hundreds of dollars.
Read Also: Window Replacement Cost: Is It Worth It for Energy Savings?
Several inexpensive products can help reduce drafts, limit heat transfer, and improve comfort. Many are removable, making them practical for apartment renters and homeowners who aren’t ready for major upgrades.
This guide compares nine affordable window insulation methods, explains which ones work best in different climates, and shows how to install them safely.
You’ll also find realistic cost estimates, potential energy savings, and practical advice on choosing improvements that fit your budget.
Quick Takeaways
- Cheapest starting point: A removable window draft stopper can cost approximately $5–$20 per window.
- Best inexpensive winter upgrade: Interior window insulation film can reduce drafts and create an insulating air layer.
- Best for nighttime comfort: Thermal curtains help reduce heat loss when closed.
- Best for small air leaks: Removable weatherstripping can improve the seal around operable windows.
- Best for summer sunlight: Reflective window coverings or solar shades can reduce unwanted solar heat gain.
- Best for renters: Prioritize removable products that won’t damage paint, trim, or window hardware.
- Biggest limitation: Window insulation products generally improve existing windows rather than matching the performance of modern replacement windows.
- Savings vary: Climate, window condition, energy prices, and installation quality determine the actual benefit.
Why Windows Lose Heat and Let Drafts In
Before buying supplies, it helps to understand why some windows make rooms uncomfortable.
Windows affect indoor temperatures through three main processes.
Read Also: Spray Foam vs Fiberglass vs Cellulose: Which Insulation Is Best for Your Home?
1. Air leakage
Air leakage happens when outdoor air enters through gaps around a window.
Common problem areas include:
- Worn weatherstripping around movable window sections
- Gaps where the window frame meets the trim
- Poorly fitting window sashes
- Cracks in older frames
- Openings around window-mounted air conditioners
In winter, cold outdoor air can enter while heated indoor air escapes.
In summer, hot and humid outdoor air can increase the workload on your air conditioner.
Sealing these gaps can improve comfort without changing the glass itself.
2. Heat transfer through glass
Even when a window is completely closed, heat can move through the glass and surrounding frame.
A window’s insulating performance is often described by its U-factor.
U-factor measures how readily heat passes through a window. Lower values indicate better insulation.
Older single-pane windows generally allow more heat transfer than modern double-pane windows with insulating glass.
Adding an interior insulating layer can reduce heat movement, although the results depend on the product and installation.
3. Solar heat gain
Sunlight entering through windows can warm indoor surfaces and increase room temperatures.
This can be helpful during cold weather but uncomfortable during summer.
The solar heat gain coefficient, or SHGC, measures how much solar radiation enters through a window as heat.
Read Also: Attic Insulation Cost Guide: R-Values, Types, and DIY vs. Pro
Lower SHGC values generally mean less solar heat enters.
According to the U.S. Department of Energy, window coverings can help manage heat loss and solar heat gain.
That makes the right insulation strategy dependent on both the window and the season.
Source: DOE Energy Saver — Energy-Efficient Window Coverings
9 Cheap Ways to Insulate Windows
The following options range from simple draft blockers to removable insulating panels.
Prices are approximate US retail ranges, not guaranteed quotes. Actual costs depend on window size, product quality, and local availability.
1. Install Window Insulation Film
Estimated cost: $8–$25 per window
Best for: Drafty windows during winter
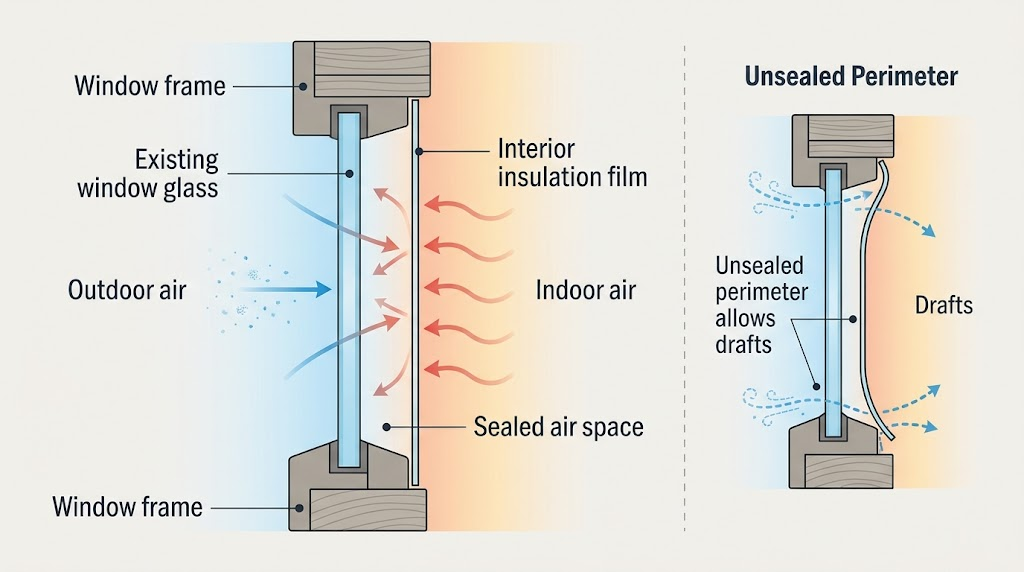
Interior window insulation film is one of the most practical low-cost improvements for older windows.
Most kits include transparent plastic film and double-sided mounting tape.
After attaching the film around the window frame, you use a hair dryer on the manufacturer’s recommended setting to shrink it until smooth.
The film creates a relatively still air space between the plastic and the window.
That air layer can reduce heat transfer. When the perimeter is properly sealed, the film can also reduce drafts entering the room.
Advantages:
- Inexpensive
- Usually transparent
- Available for different window sizes
- Often removable after the heating season
Limitations:
- Prevents opening the covered window
- May leave adhesive residue
- Can wrinkle if installed incorrectly
- May damage weak paint or delicate finishes
Renters should check lease restrictions and test adhesive on an inconspicuous surface before installation.
Never cover a window that must remain available for emergency escape.
2. Hang Thermal Curtains
Estimated cost: $25–$80 per window
Best for: Bedrooms, living rooms, and nighttime insulation
Thermal curtains use heavier fabric, multiple layers, or insulating liners to reduce heat movement around windows.
They are especially useful during cold nights.
For better performance, choose curtains that extend beyond the window frame and reach close to the windowsill or floor.
A close fit helps limit air circulation between the curtain and the room.
In winter, close curtains at night and open them during sunny periods when beneficial.
In summer, close curtains on windows receiving strong sunlight.
Thermal curtains are also useful for privacy and light control.
However, not every curtain marketed as “thermal” has independently verified energy-performance data.
Look for substantial fabric, appropriate sizing, and clear product specifications rather than relying on marketing claims.
3. Use a Window Draft Stopper
Estimated cost: $5–$20 per window
Best for: Noticeable drafts near windowsills
A window draft stopper is a fabric tube or similar barrier placed along the bottom of a closed window.
Some contain foam, polyester filling, or weighted material.
Draft stoppers are particularly helpful when cold air enters near the lower sash.
They require little installation and can usually be removed in seconds.
However, they only block airflow where they make contact.
They won’t seal gaps along the sides or top of a window, and they provide little protection against heat moving directly through glass.
For renters, draft stoppers are among the easiest improvements to try first.
4. Apply Removable Weatherstripping
Estimated cost: $5–$20 per window
Best for: Small gaps around operable windows
Weatherstripping is flexible material designed to seal gaps between moving parts.
Common types include foam tape, rubber strips, and V-shaped sealing material.
Foam tape is inexpensive and easy to install, but it can compress or wear out over time.
For rental properties, choose removable products when possible.
Avoid applying thick weatherstripping that prevents a window from closing or locking correctly.
Weatherstripping should improve the seal without interfering with normal operation.
Read Also: Air Sealing Guide: How to Find and Fix Air Leaks in Your Home
5. Add Removable Rope Caulk
Estimated cost: $5–$15 per window
Best for: Seasonal sealing of narrow gaps
Rope caulk is a soft, putty-like sealing material that can be pressed into small openings.
Unlike permanent caulk, many rope caulk products are designed for temporary applications.
It can be useful around older windows that remain closed throughout winter.
Apply it only to appropriate gaps on clean, dry surfaces.
Do not seal drainage openings, ventilation components, or emergency escape windows.
Some products may leave residue or affect painted finishes, so check the manufacturer’s instructions.
6. Install Cellular Shades
Estimated cost: $35–$120 per window
Best for: Year-round insulation and light control
Cellular shades, sometimes called honeycomb shades, contain air pockets that help resist heat transfer.
They are available in single-cell and double-cell designs.
Some models also include side tracks or other features intended to reduce airflow around the shade.
The Department of Energy identifies insulated cellular shades as an effective window covering for improving thermal performance.
Their effectiveness depends heavily on fit, design, and how they are operated.
For renters, tension-mounted or other no-drill models may be worth considering, although availability depends on window dimensions.
Cellular shades cost more than film or draft stoppers, but they can remain useful throughout the year.
7. Try Reflective Window Coverings
Estimated cost: $10–$35 per window
Best for: Reducing summer sunlight
Reflective window coverings help reduce solar heat entering a room.
Options include removable reflective shades and certain window films.
They are particularly useful on west-facing windows that receive intense afternoon sunlight.
However, reflective products can reduce daylight and change the appearance of windows.
Some adhesive films are unsuitable for certain insulated glass units, tinted glass, or other specialty glazing because of thermal stress concerns.
Check the window manufacturer’s requirements before applying film directly to glass.
For rentals, removable reflective shades may be preferable to adhesive solar films.
8. Make a Removable Interior Insulating Panel
Estimated cost: $15–$60 per window
Best for: Older windows with significant winter heat loss
A removable interior insulating panel creates another barrier between the room and the existing window.
Some products use clear acrylic or polycarbonate sheets with perimeter seals.
These allow daylight through while creating an insulating air space.
A properly fitted panel can reduce drafts and heat transfer.
However, rigid panels require careful measurement and should be easy to remove.
Avoid sharp edges, insecure mounting methods, and installations that obstruct emergency exits.
Also monitor for condensation between the panel and existing glass.
9. Seal Gaps Around Window AC Units
Estimated cost: $5–$30 per unit
Best for: Apartments and homes with window air conditioners
Window-mounted air conditioners can leave openings around their side panels and mounting hardware.
These gaps allow outdoor air to enter even when the unit is off.
Manufacturer-approved foam seals or compatible weatherstripping can improve the fit.
Use materials appropriate for the unit and follow its installation instructions.
Do not block ventilation openings, drainage paths, or required clearances.
If a window AC remains installed during winter, check whether the manufacturer permits winter covers or other seasonal protection.
Where practical and safe, removing and storing the unit according to manufacturer instructions may eliminate a significant source of drafts.
Read Also: Space Heater Cost to Run: Real Calculations + Safer, Cheaper Alternatives
Window Insulation Cost Comparison
The best product depends on whether your biggest problem is drafts, cold glass, or direct sunlight.
| Insulation Method | Approximate Cost per Window | Best Season | Renter-Friendly? | Main Limitation |
|---|---|---|---|---|
| Window insulation film | $8–$25 | Winter | Usually | Prevents window opening |
| Thermal curtains | $25–$80 | Year-round | Yes | Requires sufficient coverage |
| Window draft stopper | $5–$20 | Winter | Yes | Only blocks localized drafts |
| Removable weatherstripping | $5–$20 | Year-round | Usually | Adhesive may leave residue |
| Rope caulk | $5–$15 | Winter | Usually | Not suitable for every opening |
| Cellular shades | $35–$120 | Year-round | Some models | Higher initial cost |
| Reflective coverings | $10–$35 | Summer | Product-dependent | Can reduce daylight |
| Interior insulating panel | $15–$60 | Winter | Sometimes | Requires precise fit |
| Window AC sealing kit | $5–$30 | Year-round | Usually | Must preserve unit ventilation |
Prices are illustrative material-cost estimates. Professional installation, specialty sizes, and premium products may cost more.
Which option offers the best value?
For a renter with several drafty windows, removable weatherstripping and window insulation film are reasonable starting points.
For a sunny apartment with high summer cooling costs, solar-control shades may provide more noticeable benefits than winter-focused insulation film.
For year-round comfort, cellular shades offer a reusable option.
The cheapest product isn’t necessarily the best investment.
A $10 draft stopper won’t solve heat transfer through a large single-pane window, while an expensive thermal curtain may do little for a major gap around the window frame.
Identifying the problem first helps avoid unnecessary spending.
How to Insulate Windows Step by Step
You don’t need specialized HVAC tools to make basic window improvements.
This process works for many rental apartments and houses.
Step 1: Find the source of the problem
Inspect each window while it is closed and locked.
Look for:
- Visible gaps
- Damaged weatherstripping
- Loose window hardware
- Cold air near the frame
- Cracked caulk
- Condensation or moisture stains
On a windy day, you may be able to feel drafts with your hand.
Avoid using candles, matches, or other open flames to locate air leaks.
A tissue held near a suspected opening may help indicate airflow, although movement can also come from normal indoor air circulation.
Step 2: Measure the window
Measure the width and height in inches.
For insulation film, measure the area where the mounting tape will attach, not just the visible glass.
For curtains, measure beyond the window opening so the fabric can overlap the edges.
For rigid inserts, follow the manufacturer’s measurement instructions carefully.
Step 3: Clean and dry the surface
Dust, grease, and moisture can prevent adhesive products from sticking.
Use a cleaner compatible with the window finish.
Allow the surface to dry completely.
Avoid harsh cleaners that could damage paint, vinyl, wood, or window seals.
Step 4: Seal small air leaks
Install removable weatherstripping where the window closes against its frame.
The window should still open, close, and lock normally.
Use rope caulk only where appropriate for seasonal sealing.
Do not block designed drainage holes.
Step 5: Install window insulation film
For a typical heat-shrink kit:
- Read the manufacturer’s instructions and verify that the mounting surface is suitable.
- Apply the supplied tape around the designated frame area.
- Cut the plastic film with enough extra material to reach the tape.
- Attach the film, keeping it reasonably smooth.
- Use a hair dryer according to the kit instructions to tighten the plastic.
- Trim excess film carefully without damaging the frame.
- Inspect the perimeter for gaps.
Keep the hair dryer moving and away from curtains, loose materials, and surfaces that could be damaged by heat.
Step 6: Add a window covering
Install thermal curtains, cellular shades, or removable solar shades if additional comfort improvements are needed.
Choose the covering based on the season.
During winter, prioritize reducing nighttime heat loss.
During summer, prioritize blocking unwanted sunlight.
Step 7: Check for moisture
Inspect insulated windows periodically.
Condensation can form when warm, humid indoor air reaches a cold surface.
Persistent moisture may damage paint, wood, or surrounding materials.
If condensation develops behind an insulating film or panel, investigate air leakage and indoor humidity rather than simply adding more layers.
For additional seasonal improvements, see our guide to low-cost ways to reduce heating bills.
Best Window Insulation for Your Climate
Climate changes which products provide the greatest benefit.
A solution that works well in Minnesota may be less useful in southern Florida.
Cold Northern climates
In colder regions, reducing drafts and heat loss is usually the priority.
Consider:
- Interior window insulation film
- Removable weatherstripping
- Thermal curtains
- Cellular shades
- Properly fitted interior panels
Open suitable window coverings during sunny winter days when solar warmth is beneficial.
Close them at night to help reduce heat loss.
Monitor condensation, especially in homes with older single-pane windows.
Hot-humid Southern climates
In the Southeast and Gulf Coast, unwanted heat and humidity can increase air-conditioning demand.
Focus on reducing solar heat gain and outdoor air leakage.
Reflective shades, cellular shades, and well-fitted curtains can help limit sunlight.
Air sealing also matters because humid outdoor air can increase the moisture load on cooling equipment.
Avoid trapping moisture against window frames.
Hot, dry Western climates
Homes in areas such as Arizona, Nevada, and inland California may experience intense sunlight and large differences between daytime and nighttime temperatures.
Solar-control coverings can be particularly valuable.
West-facing windows often deserve special attention because afternoon sunlight arrives when outdoor temperatures are high.
During cooler evenings, natural ventilation may help if outdoor air quality, security, and temperatures permit.
Mixed climates
In regions with both hot summers and cold winters, flexible window coverings are useful.
Cellular shades and thermal curtains can serve different purposes throughout the year.
Seasonal window insulation film may be worthwhile in winter, particularly on older windows that don’t need to open.
For more summer-focused ideas, read our guide to keeping a house cool without lowering the thermostat.
Renter-Friendly Window Insulation Checklist
Renters often need solutions that can be removed without changing the property.
Before buying, review your lease and consider whether the installation affects paint, hardware, ventilation, or emergency exits.
| Check | What to Look For | Why It Matters |
|---|---|---|
| ☐ Lease rules | Restrictions on window modifications | Avoids unauthorized changes |
| ☐ Emergency exit | Window remains usable where required | Protects escape access |
| ☐ Surface condition | Loose paint, damaged trim, delicate finishes | Adhesives can cause damage |
| ☐ Window operation | Sashes and locks work correctly | Maintains security |
| ☐ Drainage openings | Weep holes remain unobstructed | Prevents trapped water |
| ☐ Moisture | No persistent condensation | Helps prevent damage |
| ☐ Product removal | Clear removal instructions | Reduces restoration work |
| ☐ Window dimensions | Accurate measurements | Improves fit and performance |
Which improvements are easiest to remove?
Draft stoppers and freestanding coverings generally require the least commitment.
Tension-mounted shades may also work without drilling.
Removable weatherstripping and window insulation film are convenient, but adhesives can still damage some finishes.
A product labeled “removable” does not guarantee damage-free removal.
Test materials first and document existing window damage before installation.
If a window is visibly deteriorated or doesn’t close securely, report the issue to the landlord or property manager rather than attempting a structural repair.
Realistic Costs & Savings
Cheap window insulation can improve comfort, but energy savings depend on how much heating or cooling the treatment actually reduces.
There is no reliable universal percentage that applies to every window, climate, and building.
The Department of Energy provides information about the performance of different window coverings, but results vary by product and operating conditions.
Example: Insulating five drafty windows
Assume a renter lives in a 2,000-square-foot home in a mixed climate.
The home uses an electric heating and cooling system.
For this illustration:
- Electricity price: $0.17 per kilowatt-hour (kWh)
- Annual electricity used for heating and cooling: 6,000 kWh
- Number of windows treated: 5
- Window insulation film: $15 per window
- Weatherstripping: $8 per window
- Total material cost: $115
A kilowatt-hour is a unit of electricity consumption. It represents using 1,000 watts of power for one hour.
The assumed annual heating and cooling electricity cost is:
6,000 kWh × $0.17/kWh = $1,020 per year
Now assume the improvements reduce total heating and cooling electricity use by 2%–5%.
This is an illustrative scenario, not a predicted savings range or a verified performance claim for these products.
Estimated electricity savings:
6,000 kWh × 0.02 = 120 kWh
6,000 kWh × 0.05 = 300 kWh
Estimated annual dollar savings:
120 kWh × $0.17 = $20.40
300 kWh × $0.17 = $51
In this hypothetical example, annual savings would be approximately $20–$51.
What about payback?
Simple payback estimates how long energy savings would take to equal the initial cost.
Formula:
Simple payback = Installation cost ÷ Annual savings
Using the example:
- At $20.40 per year: $115 ÷ $20.40 = approximately 5.6 years
- At $51 per year: $115 ÷ $51 = approximately 2.3 years
That produces an illustrative simple payback range of roughly 2–6 years.
However, this calculation assumes the same annual savings continue.
If the film must be replaced each winter, replacement costs would extend the effective payback period.
Some households may save very little, especially if their windows are already well sealed.
Others may notice improved comfort even when the dollar savings are modest.
How to calculate savings using your utility bill
Start by locating your electricity rate.
If your bill includes a total amount and monthly kWh consumption, you can estimate an average price:
Average electricity price = Electricity charges ÷ kWh used
For example:
$153 ÷ 900 kWh = $0.17/kWh
This average can include fixed charges that don’t change when electricity consumption falls.
For a more accurate savings calculation, use the variable per-kWh charges that apply to reduced consumption, including relevant delivery charges.
If your electricity plan uses time-of-use pricing, savings depend on when electricity use decreases.
For natural gas heating, bills commonly measure consumption in therms.
A therm is a unit of energy equal to 100,000 British thermal units (Btu).
A similar calculation applies:
Therms saved × Variable cost per therm = Estimated gas savings
For example, saving 10 therms at $1.50 per therm would reduce variable gas charges by approximately $15.
Use your actual utility rates rather than national averages whenever possible.
Why savings estimates are uncertain
Window improvements affect only part of a home’s overall heating and cooling demand.
Energy consumption also depends on insulation, air leakage elsewhere, HVAC efficiency, thermostat settings, and weather.
A house with poorly insulated attic space may lose much more heat through the attic than through minor window gaps.
Likewise, a home with a struggling air conditioner may need maintenance rather than additional window coverings.
For that reason, treat cheap window insulation as one part of a broader energy-saving plan.
Sources: DOE — Energy-Efficient Window Coverings and EIA — Electricity Data.
When Window Insulation Isn’t Enough
Low-cost products work best when the existing windows are fundamentally sound.
They cannot correct every problem.
Signs your windows may need repair
Consider professional inspection if you notice:
- Rotting wood frames
- Broken or cracked glass
- Water entering during rain
- Windows that cannot lock
- Severe frame distortion
- Persistent condensation between factory-sealed panes
- Significant drafts that remain after reasonable sealing
Condensation between the panes of a sealed double-pane window can indicate that its insulating glass seal has failed.
Interior film won’t repair that seal.
Should you replace old windows?
Replacement windows can improve comfort and performance, particularly when existing units are damaged or very inefficient.
However, replacement is usually far more expensive than basic weatherstripping or window coverings.
Energy savings alone may not justify replacing otherwise functional windows.
Homeowners should compare repair, interior storm windows, and full replacement before deciding.
If shopping for replacement windows, look at ENERGY STAR certification and the National Fenestration Rating Council (NFRC) label, which provides standardized window-performance ratings.
What about HVAC upgrades?
Poor window performance can increase the heating and cooling load on a home.
But window insulation won’t fix an improperly maintained heat pump, a clogged HVAC filter, or a malfunctioning air conditioner.
If utility bills remain unusually high, examine the entire heating and cooling system.
A qualified HVAC technician can evaluate equipment operation and efficiency.
For homeowners planning larger improvements, a home energy assessment can help identify whether air sealing, attic insulation, HVAC maintenance, or window upgrades deserve priority.
When to Call a Professional
Most removable window coverings are suitable for basic DIY installation.
Some problems require professional attention.
Contact a qualified window contractor when you find structural damage, broken glass, serious water intrusion, or windows that won’t close securely.
A professional should also evaluate major frame movement or persistent leaks around the window opening.
If you rent, notify the property owner or manager before authorizing repairs.
Important safety considerations
Emergency exits: Never permanently obstruct a bedroom window or another window required for emergency escape.
Moisture: Don’t seal drainage openings or ignore persistent condensation. Trapped moisture can damage building materials and contribute to mold growth.
Combustion appliances: Homes with fuel-burning furnaces, water heaters, fireplaces, or other combustion equipment require adequate combustion air and ventilation. Major air-sealing projects may warrant professional assessment to avoid backdrafting, which occurs when combustion gases flow into the living space instead of outdoors. Maintain working carbon monoxide alarms.
Electrical equipment: If window insulation work reveals damaged wiring or electrical components, stop and contact a licensed electrician.
Window AC units: Follow manufacturer requirements for ventilation, support, and drainage.
Space heaters: Keep curtains, insulation film, and other combustible materials at least 3 feet from portable space heaters, consistent with common fire-safety guidance. Follow the heater manufacturer’s instructions.
A professional home energy assessment can also help locate hidden air leaks and prioritize improvements.
Common Mistakes to Avoid
Cheap window insulation works best when materials are selected and installed correctly.
These mistakes can reduce performance or create unnecessary problems.
1. Sealing windows that must open
Don’t block emergency escape routes.
Use coverings that allow required windows to operate.
2. Applying adhesive to damaged paint
Old paint or poorly bonded finishes may peel during removal.
Test adhesive products before covering an entire frame.
3. Ignoring the source of drafts
A draft stopper won’t fix gaps around the top or sides of a window.
Inspect the entire assembly.
4. Blocking drainage holes
Some windows have small openings designed to release water.
Sealing these holes can trap moisture inside the frame.
5. Buying curtains that are too small
Narrow or short curtains allow more air circulation around the edges.
Choose adequate coverage for better thermal performance.
6. Using incompatible window film
Not all adhesive solar films are suitable for every glass type.
Check product and window manufacturer requirements.
7. Ignoring condensation
Moisture trapped behind film or insulating panels can damage frames.
Inspect installations regularly and address persistent humidity problems.
8. Expecting dramatic energy savings
Window insulation may improve comfort without producing a large reduction in utility bills.
Evaluate the cost alongside other improvements, such as HVAC maintenance and attic air sealing.
Frequently Asked Questions
1. What is the cheapest way to insulate windows?
A removable draft stopper or inexpensive weatherstripping is often the cheapest place to start, with materials commonly costing around $5–$20 per window. Draft stoppers work best for gaps along the bottom of a window, while weatherstripping can seal certain gaps around movable sections. If heat loss through the glass is the main problem, interior insulation film may be more useful.
2. Does window insulation film actually work?
Yes, properly installed interior window insulation film can reduce drafts and heat transfer by creating a relatively still air space between the film and the existing window. Its effectiveness depends on the window’s condition and how well the perimeter is sealed. Film is generally more useful on older, poorly performing windows than on already efficient modern windows.
3. Can renters insulate windows without damaging them?
Renters can use draft stoppers, removable curtains, tension-mounted shades, and certain temporary insulation products. Adhesive weatherstripping and film may also be suitable, but removal can damage paint or leave residue. Check lease requirements, test adhesives, and avoid modifying window hardware. Keep required emergency escape windows fully usable.
4. Are thermal curtains better than window insulation film?
Neither is automatically better. Window insulation film creates an additional air barrier and can help reduce drafts when installed correctly. Thermal curtains reduce heat transfer when closed and can also provide privacy and light control. Film is often a seasonal winter solution, while curtains are reusable throughout the year. Some households benefit from using both.
5. How can I insulate single-pane windows cheaply?
Start by checking for air leaks and applying suitable removable weatherstripping. Interior window insulation film can provide an additional insulating air layer over single-pane glass. Thermal curtains or cellular shades can further improve comfort. For homeowners seeking a more substantial upgrade without replacing the window, properly fitted interior storm windows may be worth comparing.
6. What can I put on windows to keep cold air out?
If cold air enters through gaps, use appropriate weatherstripping, removable rope caulk, or a draft stopper. If the window surface itself feels cold, interior insulation film, cellular shades, or thermal curtains may help. The best solution depends on whether the problem is air leakage or heat transfer through the glass.
7. Does bubble wrap work as window insulation?
Bubble wrap can create an additional air layer against a window and may provide some insulation. However, it reduces visibility, may not seal perimeter drafts, and does not have standardized performance claims comparable to rated window products. Avoid moisture-trapping installations and follow appropriate material safety precautions. Clear interior insulation film is generally a more practical option for occupied rooms.
8. Should I use window insulation film in summer?
Traditional heat-shrink interior film is mainly used to improve winter insulation and reduce drafts. It doesn’t necessarily block much solar heat. In hot weather, solar-control shades, suitable reflective coverings, or cellular shades may be more effective for reducing unwanted sunlight. Check compatibility before applying adhesive solar film directly to insulated or specialty glass.
9. Can insulating windows cause condensation?
Yes, certain installations can contribute to condensation problems if warm, humid indoor air reaches a cold surface and moisture becomes trapped. Proper sealing and appropriate indoor humidity help reduce this risk. Inspect windows regularly, especially during cold weather. Persistent moisture, mold, or water damage should be investigated rather than covered with additional insulation.
10. How much money can window insulation save per year?
Savings vary considerably. A household with older, drafty windows and high heating costs may benefit more than a household with modern, well-sealed windows. In the worked example above, an assumed 2%–5% reduction in heating and cooling electricity use produced approximately $20–$51 in annual savings. That is an illustration, not a prediction for any particular home.
11. Is it better to insulate windows or replace them?
If existing windows are functional but drafty, affordable weatherstripping, window coverings, or interior insulating panels may be reasonable first steps. Replacement may be more appropriate when windows are damaged, difficult to operate, or severely inefficient. Because replacement costs are substantial, homeowners should compare repair and upgrade options rather than assuming new windows will quickly pay for themselves.
12. Are there rebates for window insulation or replacement?
Some state agencies and utilities offer rebates or incentives for qualifying energy-efficiency improvements, although inexpensive insulation products may not be covered. Programs vary by state and change frequently. Check the ENERGY STAR Rebate Finder, DSIRE, your state energy office, and your utility for current eligibility and requirements.
Final Checklist: Start With the Windows That Need Help Most
Learning how to insulate windows doesn’t require expensive equipment or a major renovation.
For most renters and homeowners, the smartest approach is to identify the biggest comfort problems and address them with simple, appropriately fitted materials.
Before spending money, work through this checklist:
- ☐ Inspect windows for drafts, damaged seals, and moisture.
- ☐ Start with inexpensive weatherstripping or draft stoppers where appropriate.
- ☐ Consider window insulation film for older windows during winter.
- ☐ Use thermal curtains or cellular shades for additional comfort.
- ☐ Choose solar-control coverings for windows with excessive summer sunlight.
- ☐ Keep emergency exits, drainage openings, and ventilation unobstructed.
- ☐ Review utility bills before estimating potential savings.
- ☐ Contact a professional for structural damage, broken glass, or serious leaks.
For renters, removable products generally offer the best balance of convenience and cost.
For homeowners, inexpensive improvements can also help determine whether larger investments are necessary.
The goal isn’t to make every window perfectly insulated. It’s to reduce avoidable drafts, improve comfort, and spend money where it is most likely to help.
Pingback: Which Home Energy Upgrade Should You Do First? (Priority Guide) – Energy Savings Perlon